


37
Recording
Chapter 3 Recording and Playback
3-2 Recording
3-2-1 Basic Procedures
This section describes the basic procedures for shooting
and recording.
Before a shooting session, ensure that the camcorder is
functioning properly.
For details, see “8-1 Testing the Camcorder Before
Shooting” on page 124.
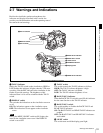
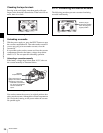
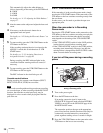
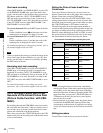
From turning on the camcorder to loading
a cassette
Proceed as follows:
Basic procedure for shooting: from power supply
to cassette loading
1
Attach a fully charged battery pack.
For details, see “7-1 Power Supply” on page 110.
2
Set the POWER switch to ON. Check that the HUMID
indicator does not appear and that the battery power
level is sufficient.
If HUMID indicator appears, wait until it disappears.
After turning off the power, check whether the drum is
dry (even if the HUMID indicator is off) when the
turning on the power again.
3
Check that there are no obstructions near the cassette
lid. Then press the EJECT button to open the cassette
lid.
4
After checking the points below, load the cassette and
close the cassette lid.
• The cassette is not write-protected.
• There is no slack in the tape.
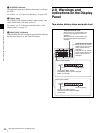
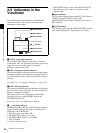
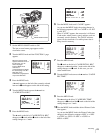
From adjusting the black balance and
white balance to stopping recording
After turning on the power and loading a cassette, set the
switches and selectors as shown below and begin
operation.
Switch and selector settings before shooting
Shooting
Proceed as follows:
Basic procedure for shooting: from adjusting the black
balance and white balance to stopping recording
1
Push the AUTO W/B BAL switch to BLK to adjust the
black balance.
For details of black balance adjustment, see “4-1-1
Adjusting the Black Balance” on page 56.
2
Select the CC filter and ND filter to match the lighting
conditions, and adjust the white balance.
When the white balance settings are already in
memory
Set the WHITE BAL switch to A or B.
When the white balance setting is not in memory
and you do not have enough time to adjust the white
balance
Set the WHITE BAL switch to PRST.
Note
2
4
3
1
2
DISPLAY: ON
AUDIO SELECT
CH-1/CH-2: AUTO
Iris: AUTO
Zoom: AUTO
OUTPUT/DCC: CAM, DCC ON
F-RUN/SET/R-RUN:
F-RUN or R-RUN
(set as needed)
3,5
4
1,2
5,6
2