80 Chapter 5 Adjustments and Settings
Chapter 5 Adjustments and Settings
Setting the Clock and Timestamping Recordings
Use the page M3 <CLOCK>of the MAINTENANCE
menu to set the camera head’s internal clock and
record the date and time.
Notes
•If the following date/time setting procedure for the
internal clock does not cause the date/time
information to be displayed in the MAINTENANCE
menu, it may be due to a worn-out lithium battery in
the camera head. See page 23 and replace the lithium
battery.
•After replacing the lithium batteries, set the internal
clock again. If you don’t, the date/time will not be
displayed.
How to set the clock
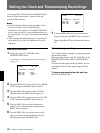
1 Display the page M3 <CLOCK> of the
MAINTENANCE menu.
For details, see “Displaying your desired menu page”
on page 55.
<CLOCK> M3 TOP
2003/08/01 08:32:45
HOUR TYPE : 12H
DATE TYPE : Y/Mn/D
CLOCK IND : BARS
2 Turn the MENU dial to move the cursor to HOUR
TYPE, then press the MENU dial to select it.
3 Turn the MENU dial to select either of 12H or
24H, then press the MENU dial to register it.
4 Turn the MENU dial to move the cursor to DATE
TYPE, then press the MENU dial to select it.
5 Turn the MENU dial to select the indication
method of year, month, and day, then press the
MENU dial to register it.
6 Turn the MENU dial to move the cursor to the
figure you wish to change in the date and time
indication, then press the MENU dial.
<CLOCK> M3 TOP
2003/08/01 08:32:45
HOUR TYPE : 12H
DATE TYPE : Y/Mn/D
CLOCK IND : BARS
7 Turn the MENU dial until your desired figure
appears, then press the MENU dial to register it.
Repeat Steps 6 and 7 until the date and time are
set.
Timestamping recordings
You can timestamp recordings by superimposing the
current date and time.
Before shooting, display page M3 <CLOCK> of the
MAINTENANCE menu, and set CLOCK IND to
CAM.
The date and time appear in the viewfinder, and are
superimposed on the video signal output from the
camera.
To stop superimposing the date and time
Set CLOCK IND to OFF.


