


48
Preparations
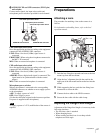
The various parts of the lens used in adjusting the flange
focal length are in different positions on different lenses.
Refer to the lens’ operation manual.
The procedure for adjusting the flange focal length is as
follows:
1
Set the iris control to manual, and open the iris fully.
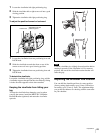
2
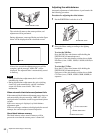
Place a flange focal length adjustment chart
approximately 3 meters from the camera and adjust the
lighting to get an appropriate video output level.
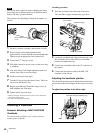
3
Loosen the Ff
2)
ring lock screw.
4
With either manual or power zoom, set the zoom ring
to telephoto.
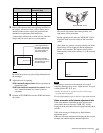
5
Aim at the flange focal length adjustment chart and
turn the focus ring to focus the image.
6
Set the zoom ring to wide angle.
7
Turn the Ff ring to bring the chart in focus. Take care
not to move the distance ring.
8
Repeat steps 4 through 7 until the image is focus at
both telephoto and wide angle.
9
Tighten the Ff ring lock screw.
1) Flange focal length: The distance between the lens mount attachment
plane and the imaging plane
2) Ff: Abbreviation of flange focal length
Attaching a Viewfinder
Example: Attaching a HDVF-20A/C30W
Viewfinder
For details on the viewfinder, refer to the instruction
manual of the viewfinder.
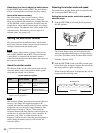
Attaching procedure
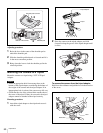
1
Slide the viewfinder in the direction of the arrow.
The viewfinder stopper automatically pops down.
2
Loosen the viewfinder left-right positioning ring, slide
the viewfinder side to side to the most convenient
position and tighten the ring.
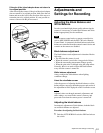
3
Connect the viewfinder cable to the VF connector of
the camera.
4
Connect the microphone cable to the MIC 1 IN
connector of the camera.
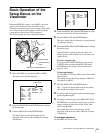
Adjusting the viewfinder position
The viewfinder position may be adjusted towards the front
and rear and to the left and right to make it easy to see into
it.
To adjust the position to the left or right
Note
About 3 meters
(10 ft)
Viewfinder stopper
MIC 1 IN connector
VF connector
Viewfinder left-right positioning ring