


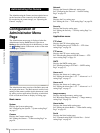
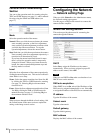


Administrating the Camera
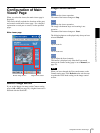
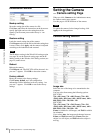
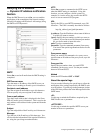
Setting the Camera — Camera setting Page
23
Note
When the shutter speed is set to 1 sec or 1/2 sec in the
Shutter priority or Manual mode, set the Focus mode
menu and the White balance mode menu to Manual.
Exposure compensation
When the Exposure mode menu is set to Full auto,
Shutter priority or Iris priority, select On to activate
the exposure compensation, or Off to deactivate it.
When it is set to On, select the EV value from among the
following:
+1.75, +1.5, +1.25, +1, +0.75, +0.5, +0.25, 0, –0.25,
–0.5, –0.75, –1, –1.25, –1.5, –1.75 (EV)
Saturation
Select the saturation in 7 steps, from –3 to 3.
Selecting 3 gives the image with the highest saturation.
Note
The Saturation setting is effective for the computer
image only. (It is not effective for the video signal
output.)
Sharpness
Select the sharpness in 16 steps, from 1 to 16.
Selecting 16 gives the image with the highest sharpness.
Contrast
Select the contrast in 7 steps, from –3 to 3.
Selecting 3 gives the image with the highest contrast.
Note
The Contrast setting is effective for the computer image
only. (It is not effective for the video signal output.)
Camera reset
Click Apply, and “Camera reset OK?” appears. Click
OK on the dialog to reset the camera settings on the
Camera setting page to the factory settings.
Zoom Position
Click Store to store the current zooming position in the
memory of the camera. When the power is turned on
next time, the stored zooming position is recalled.
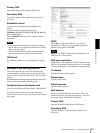
Day/Night setting Section
Day/Night mode
Select the Day/Night mode that selects the IR (infrared)
cut filter operation mode from among Disable, Auto,
Manual and Timer.
After selecting the mode, click OK to update the camera
to the selected mode.
Disable: The Day mode is always set.
Auto: The Day/Night mode is set automatically. It is
normally set in the Day mode and changes to the
Night mode in a dark place.
Manual: Set the Day/Night mode manually.
If you select Manual, the Day/Night On/Off menu
appears. Select On to set to the Night mode, and Off
to the Day mode. You can also selcect the Day/Night
mode from the trigger control parts (see page 12).
Timer: Set the Day/Night mode using the timer.
If you select Timer, the Schedule No. menu appears
at the bottom. Select the schedule so that the Day/
Night mode is normally set to the Day mode, and it
enters the Night mode at the start time of the
schedule and returns to the Day mode at the end time.
Tip
If the Focus mode menu is set to Manual, the ONE
PUSH AF function automatically operates when the
Day mode and the Night mode are switched.
Schedule No.
When the Day/Night mode menu is set to Timer, click
the check box of the desired schedule No.1 to 6 to
activate the Day/Night mode.
To check the contents of the schedule, click Schedule
check. (See “Setting the Schedule — Schedule setting
Page” on page 43.)
OK/Cancel
See “Buttons common to every setting page” on page
17.