


23
GB
Assigning the IP Address to the Camera
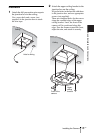
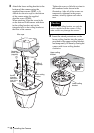
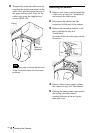
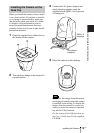
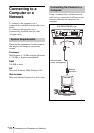
Basic Installation and Connections
1 Insert the supplied CD-ROM
disc into your CD-ROM drive.
After s short time a window will open
displaying the files on the CD-ROM.
2 Click the Setup icon of IP Setup
Program.
The File Download dialog opens.
3 Click Open.
You cannot install the IP Setup Program
properly if you click Save in the File
Download dialog.
Delete the downloaded file, and click the
Setup icon again.
4 Install the IP Setup Program to
your computer following the
wizard displayed.
If “Software License Agreement” is
displayed, read it carefully and accept
the agreement to continue the
installation.
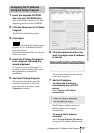
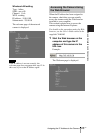
5 Start the IP Setup Program.
The program detects the network
camera(s) connected on the local
network and lists it (them) on the
Network tab window.
6 Click the camera to which you
want to assign a new IP address
in the list.
The network settings for the selected
camera are displayed.
7 Set the IP address.
To obtain the IP address
automatically from a DHCP
server:
Select Obtain an IP address
automatically.
The IP address, Subnet mask and
Default gateway are assigned
automatically.
To specify the IP address
manually:
Select Use the following IP address,
and type the IP address, Subnet mask
Assigning the IP Address
Using the Setup Program
Note