


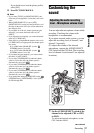

Recording
Recording
41
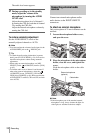
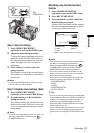
Step 1: Store the settings
1
Press STORE/CHECK/EXEC
repeatedly to turn on the STORE lamp.
2 Adjust the desired items manually.
To adjust the camera setup items such as iris
manually, set the AUTO LOCK switch to
the center position to release the auto lock
mode. See pages 26 to 30 for details on
adjustment.
3 Press a button (A or B) to select the
storage location.
The setting is stored in the selected button.
The settings are called Shot A and Shot B
respectively.
b Note
• If you set the POWER switch to OFF, the settings
stored in Shot A and B are deleted.
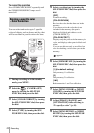
Step 2: Check the stored settings (Shot)
1
Press STORE/CHECK/EXEC
repeatedly to turn on the CHECK lamp.
2 Press the button (A or B) in which the
setting was stored.
The selected setting will take effect on the
picture on the screen. The focus, zoom, and
so on, are automatically adjusted as stored
in the setting.
b Note
• You cannot check the transition time, curve set, and
start timer using [SHOT TRANS] on the
(CAMERA SET) menu.
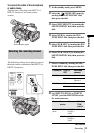
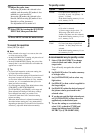
Recording using the Shot transition
function
1
Press STORE/CHECK/EXEC
repeatedly to turn on the EXEC lamp.
2 Press REC START/STOP.
3 Press the button (A or B) in which the
desired setting was stored.
Pictures will be recorded with the settings
that were changed automatically from the
current ones to the stored ones.
b Note
• You cannot zoom, focus, or adjust manually while
checking or activating the Shot transition.
• When you change [SHOT TRANS] on the
(CAMERA SET) menu, turn off the STORE/
CHECK/EXEC lamp by pressing the button.
• You cannot return from the stored Shot A or B
settings to previous settings after you activate the
Shot transition during recording.
• If you press the following buttons during the shot
transition operation, the operation is canceled:
– PICTURE PROFILE
–MENU
–P-MENU
– EXPANDED FOCUS
– STATUS CHECK
z Tip
• You can record using both settings by making them
change either from Shot A to Shot B or from Shot B
to Shot A. For example, to change from Shot A to
Shot B, turn on the CHECK lamp and press A
followed by REC START/STOP, then turn on the
EXEC lamp and press B.
• You can rehearse the shot transition by pressing the
button (A or B), in which the desired setting was
stored, before pressing REC START/STOP in step
2.
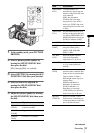
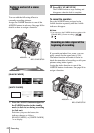
REC
START/STOP
SHOT TRANS EXEC
ES
REC 00:00:05:00120min
3sec
SHOT A
SHOT B
Transition bar
S: start
E: end
Countdown
display*
*Appears when the start timer is activated.