PI1000
5
SVAT ELECTRONICS
now you can see
6. NAME
6. NAME
AND FUNCTION OF EACH P
AND FUNCTION OF EACH P
ART
ART
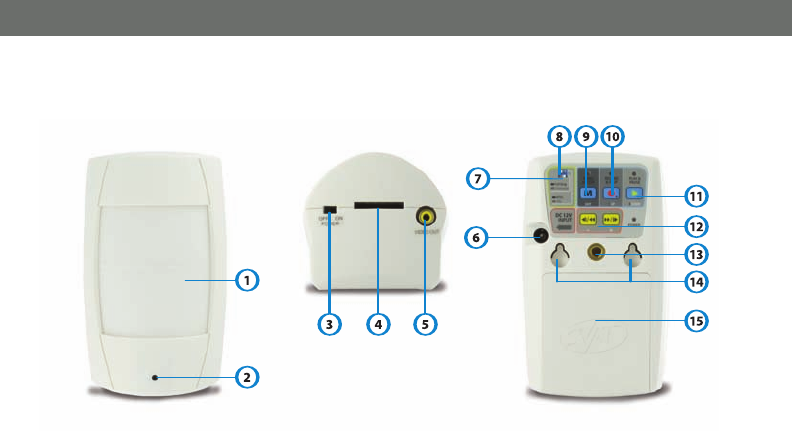
1. Imitation Sensor
2. Pinhole camera
3. Power Switch
When power-loss occurs during recording, errors may occur. To switch off the
power correctly, always press the MENU button first to stop recording, then
switch off the device.
4. SD Card Slot
5. V
ideo Output Jack
To enable monitoring functions, connect one end of the RCA wire to the Video
Out jack and the other end to your TV's video input jack. Make sure that your
TV is said to VIDEO INPUT
mode in order to view your DVR onscreen.
6. RCA Video Output
7. Full Stop/Overwrite
Select whether to overwrite the recorded SD card or to stop recording when the
SD card is full. When you select “Overwrite”, the stored video will be overwritten
starting with the oldest data first.
When you select “Full Stop”, the recording will automatically stop when the SD
card is full. The LED indicator on the front panel will start flashing. Note that Full
Stop/Overwrite can only be set before powering the unit on.
8.
NTSC/PAL
If you are in North America, keep the switch set to NTSC.
The two most common video standards used are NTSC and PAL. NTSC is the
video system commonly used in North
America, Taiwan, Japan, Korea, and
South America. PAL is the predominant video system used in China, Hong
Kong, Europe, and India. Please select and switch to the system that best suits
your location. Note that the PAL/NTSC can only be set before powering
the unit on.
9. Menu Button
10. Record & Stop Button
1
1. Play & Pause button
12. Reverse & Forward Buttons
13. Mounting Holes
14. Flush Wall Mount Holes
15. Battery Compartment


