52
••••••••••••••••••••••••••••••••••••••••••••••••••••••••••••••••••••••••••••••••••••••••••••••••••••••••••••••••••••••••••••••••••••••••••••
■ HOLIDAY SETTING
Holidays throughout the year can be set in advance.
<HOLIDAY SETTING>
--/-- --/-- --/-- --/--
--/-- --/-- --/-- --/--
--/-- --/-- --/-- --/--
--/-- --/-- --/-- --/--
--/-- --/-- --/-- --/--
MONTH/DAY
1. Press the SET UP button
}
<SETTINGS>
}
Select
“HOLIDAY SETTING” in the <TIMER PROGRAM SETTINGS>
screen, and display the desired holidays and confirm.
2. Turn the SHUTTLE ring counterclockwise or press the SET
UP button.
When there is an overlap between <HOLIDAY SET-
TING> and <TIMER PROGRAM> the unit given record
priority to the holiday over the others.
■ Recording mode settings A ~ D for normal
recording/alarm recording
The camera, recording intervals and recording picture qual-
ity for normal recording/alarm recording can be set to 4
patterns of recording mode settings A ~ D (for details con-
cerning recording mode settings, see pages 27, 28,
47-49).
1. Press the SET UP button
}
<SETTINGS>
}
Select “REC
MODE A” in the <TIMER PROGRAM SETTINGS> screen and
turn the SHUTTLE ring clockwise.
• The <REC MODE A> screen appears.
<REC MODE A>
>>
ALARM SETTING
RECORD SETTING
MOTION DET REC ALARM
2. Turn the JOG dial to select either “ALARM SETTING” or
“RECORD SETTING” and confirm.
3. When continuing to REC MODE B ~ D, repeat step 2.
The storage area in MAIN HDD set in “PARTITION”
is displayed with the percentage(%) and the record-
able time of that storage area is displayed in “<ESTD
REC>” (For details on PARTITION,
see page 84).
■ MOTION DET REC
Recording is done with the recording interval and the
quality set by “A-PPS” and “A-GRADE”, independent of
if “ALARM” or “NORMAL” has been selected (for details
concerning setting MOTION DET REC, see page 49).
■ ALARM REC DURATION
The recording time for alarm recording can be set (for
details concerning setting ALARM REC DURATION,
see page 49).
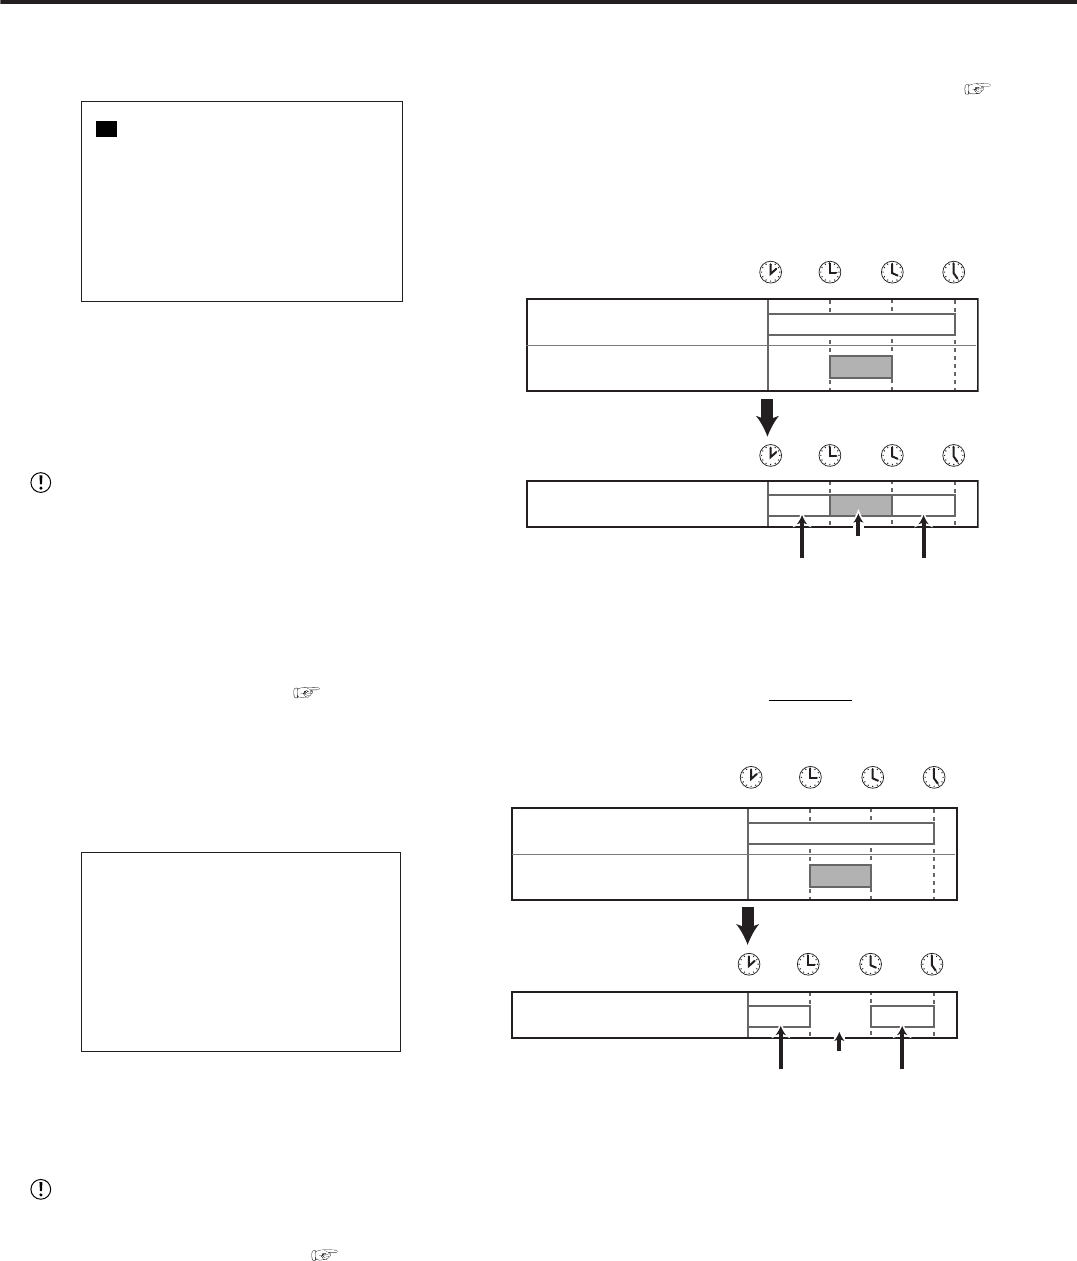
♦ Overlapping Timer settings
When Timer settings overlap, the unit will give priority to
the larger (example 4 over 1) numbered program.
Example 1
14:00 15:00 16:00 17:00
14:00 15:00 16:00 17:00
Example 1)
In Program 1, recording is set for PPS
to 5P, from 14:00 to 17:00.
1P
In Program 2, recording is set for PPS
to 1P, from 15:00 to 16:00.
Actual recorded contents
5P 5P
Program 2
5P
1P
Program 1 Program 1
Example 2
• Program 1 is set for 14:00 to 17:00 with the PPS to 5P.
• Program 2 is set for 15:00 to 16:00 with the SKIP setting.
Again, the unit will give priority to Program 2 for the duration of
the overlapping period. As shown in the illustration below, the
unit will activate the Skip setting from 15:00 to 16:00.
5P
5P
NO
RECORDING!
14:00 15:00 16:00 17:00
14:00 15:00 16:00 17:00
Example 2)
SKIP
In Program 2, the SKIP setting is
entered for 15:00 to 16:00.
5P
Actual recorded contents
Program 2
Program 1 Program 1
In Program 1, recording is set for PPS
to 5P, from 14:00 to 17:00.
<TIMER PROGRAM SETTINGS> (continued)


