


Download this book for free at http://www.TheArgusA.com/
42
The only reason to take it off is to clean around it or to polish it with aluminum
polish. If you attempt to polish it, be prepared to spend a lot of time scrubbing the
knurled portion. Ensure that when you replace the knob, the slot in the screw-hole of the
knob is properly lined-up.
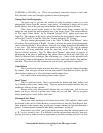
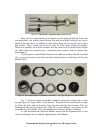
View Finder
The View Finder is one of the trickier parts of the Body. It consists of two lenses,
a round one and rectangular one, on either side of the View Finder. If at all possible, try
to avoid disassembling the viewfinder, because both lenses can be easily damaged or
replaced incorrectly so as to get lost later. Be careful not to use too much cleaning
solution when wiping the viewfinder lenses, because the fluid may leak to the other side
of the lens.
In the earliest models, perhaps the first twenty thousand Argus As, the rear lens of
the View Finder (the one closest to the eye), is secured by two bakelite tabs. These tabs
are a part of the Body of the camera and wrap around the bottom of the lens to keep it in
place. This makes removing the lens risky business, because the tabs must be spread
apart and may break, making the View Finder useless. One should only attempt this if
one accepts the risks involved.
In other early models like the early As and the AFs, the rear lens is held in place
by a thin metallic band. This metallic band is glued in place and can only be removed by
breaking it up into various pieces. This is a tricky thing to attempt, and one stands a good
chance of damaging the lens while trying to pry out that stubborn band.
In the later As, A2Bs, A2Fs, AAs and FAs, the rear viewer lens is retained by a
ring, which is easily pried out and replaced, allowing easy access to both View Finder
lenses and the inside of the viewfinder. Still, be careful not to chip the glass.
The front lens of the View Finder on earlier models is held in by either a tiny bit
of glue or a very tight fit. Only on later models is there a rectangular “ring” which
follows the perimeter of the lens and keeps it from slipping out. Do not try to pry the lens
out through the front of the camera. It is best to remove the rear lens and push the
forward lens out with a Q-Tip. When replacing a lens without a retaining ring, apply a
TINY bit of glue around the edge of the lens with a razor to keep it in place. Before
permanently replacing both lenses, look through the viewfinder to confirm that
everything looks right.
The rear lens retaining ring is the same as the rear lens retaining ring for the
rangefinder and viewfinder of the Argus C, C2, and early C3s. In addition, these cameras
all share the same rear viewfinder lens, although the rangefinder lens is different. Keep
this in mind as a source of spare parts if you lose the ring or damage the lens.
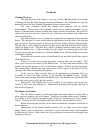
Counter Dial
The Counter Dial is relatively simple to disassemble, but there is not much that
can be done to repair it except replacing the parts from another camera. Just remove the
retaining screw and pull the parts out.
Underneath the main Dial with the lines and numbers, there are two other items
that spin with the screw. The first is a copper disc which is slightly indented like a bowl.
Sometimes the disc has slits in it and sometimes there are multiple discs. There is also a
copper or brass cylinder. These pieces are supposed to work like a clutch to allow you to