


Download this book for free at http://www.TheArgusA.com/
54
Again, reassembling the Shutter is trickier than taking it apart. The steps are the
reverse of disassembly, but care must be taken to ensure that all of the various
components, particularly the cams on the Face Plate, line up properly. When replacing
the Face Plate, make sure that the Shutter Speed Lever is at the top of the Shutter. The
two levers that ride cams on the Face Plate must be aligned properly or the mechanism
will be jammed or damaged. Periodically test the mechanism while reassembling to
make sure everything is properly assembled.
The Argus AA Shutter
The Shutter of the Argus AA is unlike any other Argus shutter. It was specially
designed to work with a flash and it has only two speed settings, Time and Inst.(instant).
The mechanical portion of this Shutter is therefore much simpler than the other Argus
Shutters.
Servicing the Shutter is simple.
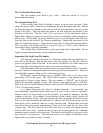
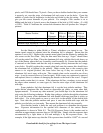
To disassemble the Shutter, unscrew the Lens Assembly from the front by turning
the metal cylinder with your hand. Then remove the two tiny screws that sit on the Face
Plate. The cosmetic metal plate, with the all of the writing on it, should then fall off. Lift
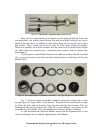
up the next metal plate to expose three screws. Remove the three screws underneath the
metal plate that just came off. Once these screws are undone, the faceplate should come
off completely. The removed portion can be disassembled further, but it is rarely
necessary. No further screws need to be removed inside of the shutter mechanism.
Lubricate the four spindles lightly. Do not allow lubricant to flow into the flash
mechanism or behind the shutter.
Reassembly is simple as well; merely reverse the disassembly steps. There is
only one cam lever, and it fits easily into a round hole on the Face Plate.
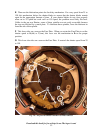
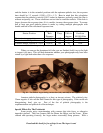
Fixing The Iris And Other Repairs
The aperture iris is one of the components of the Shutter that very rarely breaks.
Most often the problem can be traced to the metal ring that the Aperture Lever and
Aperture Indicator stem from. This metal ring can be seen and adjusted on the back of
the Shutter, after you remove the Neck.
Unfortunately, the shutter mechanism sits on top of the aperture iris. The only
way to access the actual iris blades is to remove the shutter mechanism. This can be done
by removing the Face Plate and undoing the screws that keep the shutter mechanism in
place. This is not recommended because the shutter mechanism has several springs that
can loosen or get lost while removing the mechanism. Understand that if you remove this
mechanism, you stand a good chance of being unable to replace it.
Finding Light Leaks
Now that you’ve reassembled the camera and tested it, you may come across light
leaks. These are nasty bright spots that appear on the negative and the print that result
from light leaking into the camera.
If your camera sprouts a light leak when you first use it, check the Neck for a
hairline crack. The easiest way to find such a small crack is to run your fingernail across