


Download this book for free at http://www.TheArgusA.com/
43
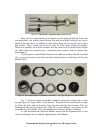
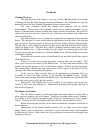
set the Counter Dial to “0” when the camera is first loaded with film. Unfortunately, this
clutch often fails and begins to unscrew the retaining screw.
When reassembling, ensure that these items are replaced onto the screw in the
proper order; first the Dial, then the copper discs (with the “rim” of the bowl touching the
Dial), and then the brass cylinder. This mechanism screws into the center of a gear of the
film transport system and this gear must be held in place while screwing the Counter Dial
mechanism back in. The Counter Dial gear is located directly behind the gear attached to
the Sprocket Wheels. Use a pencil or screwdriver to keep the Counter Dial gear from
moving during reassembly. When properly installed, the Counter Dial gear is perfectly
aligned with the Sprocket Wheel gear. Do not overtighten the screw, or it will prevent
the Counter Dial and film transport system from working properly. If, after reassembly,
there are film transport problems that did not exist before, check the alignment of the
Counter Dial gear first.
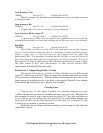
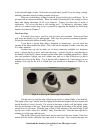
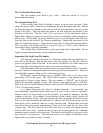
Sprocket Wheels
The Sprocket Wheels are an integral part of the film transport system. Most of
the system is hidden behind a glued block under the serial number and above the
Sprocket Wheels.
Occasionally, a Sprocket Wheel will loosen on its shaft and spin freely. Glue it
back into place with epoxy, but ensure that the sprockets from the top wheel and the
bottom wheel are aligned.
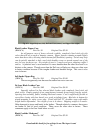
Back Cover
The Back Cover is relatively simple. It is completely interchangeable between all
of the various models.
On the inside of the Back Cover, the entire surface should be flat black. Some
earlier versions have a felt-like texture that was glued on, but more commonly one sees
just paint. In either case, worn or scratched areas can be touched up with flat black
model paint.
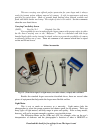
The Lock Catch may have to be bent in order to get it to tighten or loosen its grip
on the back of the camera. Making sure that the Back Cover removes easily but stays in
place is crucial, because the worst thing that can happen in the middle of a roll of film is
having the back of the camera pop off. Bend the Lock Catch with a pair of pliers, but
first wrap them in some tape to ensure that the pliers don’t leave any “tooth marks” on
the Catch.
If the camera had film left in it for several years, then the foam Film Cartridge
Retainer is probably dried out and stiff. You have two options: leave it the way it is or
replace it with ½ inch wide weather-stripping from a hardware store. The Film Cartridge
Retainer was designed to hold a variety of different type of film cartridges in place, but it
is not crucial for the modern 35mm film cartridge. So one can leave it for authenticity or
replace it for appearance with little worry about it affecting the operation of the camera.
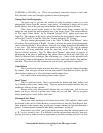
The Pressure Plate is the greatest change in the evolution of the back cover. All
of the pre-war models (A, AF, pre-war A2B, A2F, and AA) have a fixed, black plastic
Pressure Plate. If it breaks off, it can be glued back into place with a tiny bit of glue. The
Plate must maintain the same height and must be in the same position, so take care to