


11
AXIS 241Q/241S - Installation
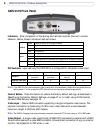
Connecting video cameras
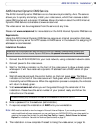
Coaxial cable
Connect the video output of your
camera(s) to the AXIS 241Q/241S video
server using a standard 75 Ohm coaxial
video cable with BNC connectors.
Note: Use a RCA-to-BNC adapter if your camera has a standard phono-type (RCA) connector.
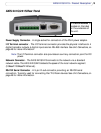
Installation Methods
The AXIS 241Q/241S is designed for installation on an Ethernet network. This involves
assigning it an IP address, either manually or via an automated network service (DHCP).
Select one of the following procedures depending on your network:
• In Windows, use AXIS IP Utility to discover a dynamic IP address, or to set the IP address
manually.
• If your network uses a DHCP server, view its administration pages to discover which IP
address has been assigned to your AXIS 241Q/241S.
• If your network uses a DHCP server and your computer is running UPnP™, the AXIS
241Q/241S will automatically be detected and displayed on your screen. See
page 12.
• Assign an IP address manually using the ARP/Ping method, as described on page 13.
• If your network has an Internet connection (with no HTTP proxy) and uses a DHCP server
to assign IP addresses, use the One-Click installation procedure. See
page 15.
Notes: • The AXIS 241Q/241S has a default IP address: 192.168.0.90
• DHCP is enabled by default in the AXIS 241Q/241S
• UPnP™ is enabled by default in the AXIS 241Q/241S
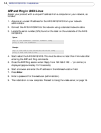
AXIS IP Utility
AXIS IP Utility is a free Windows
application that discovers and displays
Axis devices on your network. The
application can also be used to
manually set a static IP address.
Download AXIS IP utility from the
support pages at:
www.axis.com/techsup/software
Automatic discovery
1. Check that the network and power cables are connected to the AXIS 241Q/241S.
2. Start AXIS IP Utility. When the AXIS 241Q/241S appears in the window, double-click
it to open the home page.