


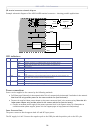

AXIS 225FD - System Options
32
Network - Bonjour
The AXIS 225FD includes support for Bonjour. When enabled, the camera is automatically detected by operating
systems and clients that support Bonjour.
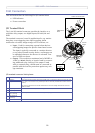
Ports & Devices
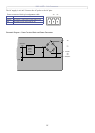
I/O Ports
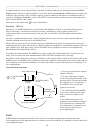
The two alarm inputs and one output on the AXIS 225FD can be connected to various external devices, e.g. door
sensors and alarm bells. The name given to the ports can be changed and state of the I/O ports can be set to
Open circuit or Closed circuit.
The pinout, interface support and the control and monitoring
functions provided by this connector are described
in Unit Connectors, on page
35.
COM Port RS485/422
The RS-485/422 port can also be configured to allow it to be controlled by TCP/IP applications. The TCP/IP
parameters are described in the online help.
LED Settings
The Status indicator LED can be set to flash at a configurable interval (or to not light up at all) whenever the
unit is accessed. For a listing of all LED behavior, see page 6, or the online help.
Note:
The LED does not flash when the stream is retrieved using MPEG-4 multicast.
Maintenance
• Restart - The unit is restarted without changing any of the settings. Use this method if the unit is not
behaving as expected.
•Restore - The
unit is restarted and most current settings are reset to the factory default values. The
only settings saved are:
• the boot protocol (DHCP or static)
•
the static IP address
• the default router
• the subnet mask
• the system time
• Default -
The Default button should be used with caution. Pressing this button will return all of the
camera's settings, including the IP address, to the factory default values. The camera will then have to
be re-installed.
Upgrade Server - Se
e Upgrading the Firmware, on page 38.
Backup - To
take a backup of all of the parameters, and any user-defined scripts, click the Backup button. If
necessary, it is then possible to return to the previous settings if the settings are changed and there is
unexpected behavior.
Restore - click the Br
owse button to locate the saved backup file (see above) and then click the Restore button.
The settings will be restored to the previous configuration.
Note:
Backup and Restore can only be used on the same unit running the same firmware. This feature is not intended for the configuration of
multiple units or for firmware upgrades.