


161
wPrinting
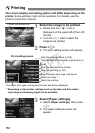
You can crop the image and print only
the trimmed portion as if the image was
recomposed. Do the trimming right
before printing. If you set the trimming
and then set the print settings, you may
have to set the trimming again.
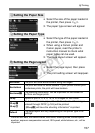
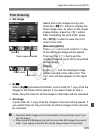
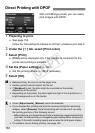
1 On the print setting screen, select [Trimming].
2 Set the trimming frame size, position, and proportion.
The image area within the trimming frame will be printed. The trimming frame’s
vertical-to-horizontal proportion can be changed with
[
Paper settings
].
Changing the trimming frame size
When you press the <u> or <I> button, the size of the
trimming frame will change. The smaller the trimming frame, the
larger the image magnification will be for the printing.
Moving the trimming frame
Use <
9
> to move the frame over the image vertically or horizontally. Move
the trimming frame until it covers the desired image area or composition.
Rotating the frame
Each time you press the <
B
> button, the trimming frame will toggle
between the vertical and horizontal orientations. This enables you to
create a vertical-oriented print from a horizontal image.
Image tilt correction
By turning the <5> dial, you can adjust the image tilt angle by
±10 degrees in 0.5-degree increments. When you adjust the
image tilt, the <O> icon on the screen will turn blue.
3 Press <0> to exit the trimming.
X The print setting screen will reappear.
You can check the trimmed image area on the upper left of the
print setting screen.
Trimming the Image
Tilt correction
COPY