


115
Printing
E
Printing
Printing Still Images
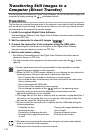
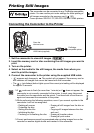
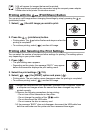
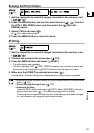
Connecting the Camcorder to the Printer
1. Set the camcorder to view still images ( ).
2. Insert the memory card or disc containing the still images you want to
print.
3. Turn on the printer.
4. Select as the media for the still images, the media from where you
want to print the images.
5. Connect the camcorder to the printer using the supplied USB cable.
• appears and changes to . The symbol will not appear if the memory card or
disc contains still images that cannot be viewed with this camcorder.
• The (print/share) button lights up and the current print setting will be displayed
for approx. 6 seconds.
If continues to flash (for more than 1 minute) or if does not appear, the
camcorder is not correctly connected to the printer. In such case, disconnect
the cable from the camcorder and the printer. Turn them both off and then on
again and reconnect the camcorder to the printer.
While performing the following operations, even if you connect a printer to the
camcorder it will not be recognized.
Correct performance cannot be guaranteed when printing images from a disc
recorded on another digital device and inserted in this camcorder.
The camcorder can be connected to any PictBridge compatible
printer. You can use the print order settings for direct printing of
still images recorded on the memory card ( 120).
Canon printers: SELPHY CP, SELPHY DS and PIXMA printers
- Deleting all scenes
- Protecting the disc
- Setting the disc title
- Initializing the disc
- Finalizing or Unfinalizing the disc
- Erasing all still images from the disc or
card
- Copying still images between the disc
and card
- Erasing all transfer orders
- Erasing all print orders
PictBridge
compatible printer
USB Cable (supplied)
Open the
terminal cover