


31
Preparations
E
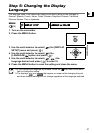
Step 8: Loading and Removing a Disc
Inserting the Disc
1. Move the power switch to ON to
set the camcorder in CAMERA
mode ( 11).
2. Move the / switch to the
(Movies) position.
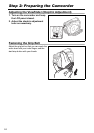
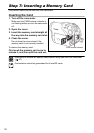
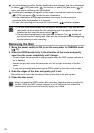
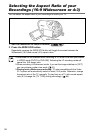
3. Slide the OPEN switch fully in the
direction of the arrow and gently
open the disc cover completely
until it stops.
Retract the grip belt under the camcorder
so it will not get in the way of the disc
cover.
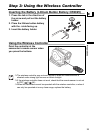
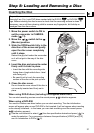
4. Insert the disc and press its center
firmly until it clicks in place.
• Insert the disc with the recording side
facing down (single sided discs - label
side facing out).
• Be careful not to touch the recording
surface of the disc or the pick up lens.
5. Close the disc cover.
Do not force the cover closed if the disc is
not correctly inserted and firmly set in
place.
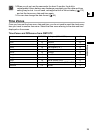
When using DVD-R discs (including the supplied blank disc):
You can start recording movies once the record pause indication appears.
When using a DVD-RW:
You need to initialize new discs before you can start recording. The disc initialization
screen will appear when a new DVD-RW is first inserted (it will not appear when inserting
a disc already initialized – in that case, you can start recording once the record pause
indication appears).
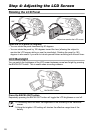
Use the multi selector to select ( ) the disc specification desired and press ( ) to
make the selection. For a comparison between the specifications [VIDEO] and [VR]
see An Introduction to DVDs (6).
Preparations:
Use only 8 cm (3 in.) mini DVD discs marked with the DVD-R or DVD-RW
logo. Before inserting the disc be sure to check that the recording surface is clean. If
necessary, use a soft lens-cleaning cloth to remove any fingerprints, dirt buildup or
smudges from the disc surface.