


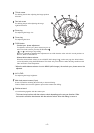


- 6 -
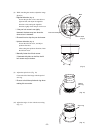
70mm (2.76")
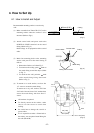
Recommended mounting surface is wood or dry
wall.
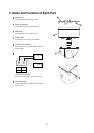
(1) Make a round hole of 70mm OD (2.76") to the
mounting surface where the camera is to be
mounted. (Refer to Fig.1)
4-1 How to Install and Adjust
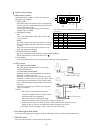
(2) Attach coaxial cable and power cord to the
POWER & VIDEO terminal on the metal
fitting. (Refer to Fig. 2)
Refer to Page 11 for preparation of the coaxial
cable.
4. How to Set Up
(Fig. 1)
(Fig. 2)
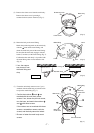
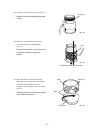
(3) Mark four mounting holes to the mounting
surface with pencil for the metal fitting as
follows:
1. Dimensions: Refer A or B from Fig. 3.
2. To mount on the ceiling, point mark on
the metal fitting toward the object. (Refer
to Fig. 3)
3. To mount on the wall, point the mark
on the metal fitting facing downward.
(Refer to Fig. 3)
Unit : mm (inch)
(Fig. 3)
Ceiling
Ceiling
Metal fitting
Ceiling mount screws
Coaxial cable
46 (1.81)
83.5 (3.29)
46 (1.81)
66.7 (2.63)
83.5 (3.29)
Power cables
(4) To mount on a wood surface, use four #8x
1.5" screws to secure the metal fitting.
To mount on a dry wall surface, drill four
3/16" holes first and insert 3/16" anchors then
secure the metal fitting with four #8x1.5"
screws.
All hardware is optional.
To directly mount on the surface, make
sure to use four screws to ensure firm
locking.
Be careful not to damage the coaxial or
power cables.
If it is impossible to make a 70mm hole to
the surface, use an optional metal fitting for
the wall (EB-413B).
Ax4
Bx4
mark