


96 Solving Problems
Quality Problems
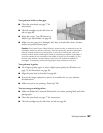
You see banding (light lines).
■ Clean the print head; see page 77 for
instructions.
■ Select a higher print quality and turn off
High Speed mode; see page 31 (Windows)
or page 38 (Macintosh).
■ Select the correct Type or Media Type
setting for your paper; see page 40.
■ Make sure the printable side of the paper is face-up; it’s usually whiter or shinier.
■ The ink cartridges may need replacing; see page 80.
■ Align the print head as described on page 84.
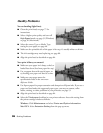
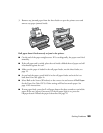
Your print is blurry or smeared.
■ Make sure your paper isn’t damp, curled, or
loaded face down (load new paper face up).
■ Use a support sheet with special paper, or
try loading your paper one sheet at a time.
■ Make sure your paper meets the
specifications listed in the on-screen
Reference Guide.
■ Use Epson papers for proper saturation and absorption of Epson inks. If you use a
paper not listed under the supported paper types, you may see smears, roller
marks, misting, or other problems in your printouts; see page 13.
■ Align the print head as described on page 84.
■ Select the Thick paper checkbox in your printer software. Access the setting from
the printer settings window as follows:
Windows: Click
Maintenance and select Printer and Option Information.
Mac OS X: Select Extension Setting from the pop-up menu.