23
1
SETTING THE DATE AND TIME
22
SWITCHING ON AND OFF
➀
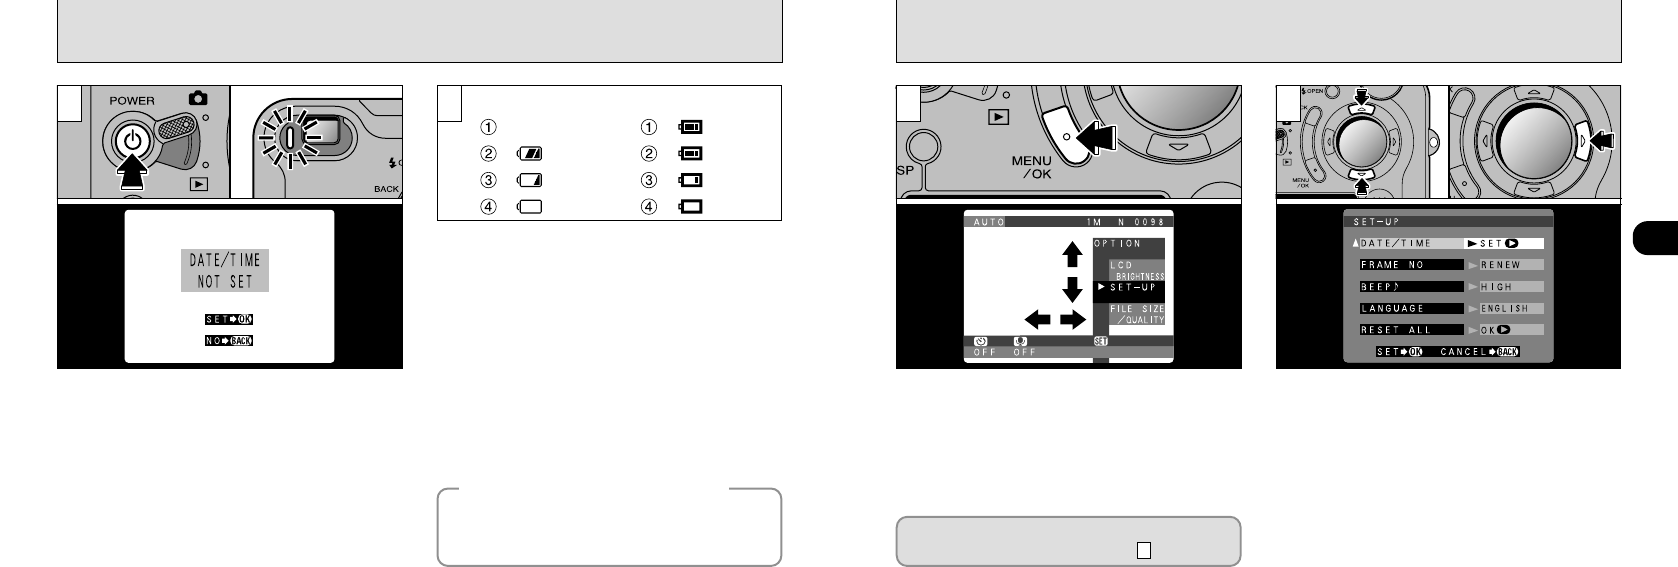
Press the “MENU/OK” button to display the
menu screen.
➁
Use “d”, “c”, “a” or “b” to select “SET–UP”
from the “QOPTION” menu.
➂
Press the “MENU/OK” button.
➀
The “SET–UP” screen appears.
Use “a” or “b” to select “DATE/TIME”.
➁
Press “c”.
●
!
See P.92 for more information on the “QOPTION”
menu.
●
!
If at least 3 hours have passed since the AC power
adapter was connected or the battery inserted and
date and time set, then those settings will be
maintained for roughly 1 hour even when the camera
has no power supply (when the AC power adapter is
disconnected and the battery is removed).
If the date was cleared and you selected “SET
DATE/TIME”, proceed from step (➡P.24).
3
2
Blank
LCD Monitor Display Panel
Blinking red
Lit red Flashing
Lit white
Press the “<” (power) button to switch the
camera on and off. When you switch the camera
on, the viewfinder lamp lights (green).
If the date has been cleared, a confirmation
message appears. To set the date, press the
“MENU/OK” button (➡P.24).
1
◆
Auto Power Save Function
◆
You can check the remaining battery charge on
the LCD monitor by pressing the “DISP” button
to switch the LCD monitor on.
➀
Battery has ample charge. (No indicator
displayed.)
➁
The battery is approximately half charged.
➂
Battery charge low. Replace or recharge the
battery as it will run out shortly.
➃
The battery is exhausted. The display will
shortly go blank and the camera will stop
working. Replace or recharge the battery.
●
!
The display panel icons
➀
and
➁
are only shown for
2 seconds when the camera is switched on.
2
●
!
If you switch the camera on when the Mode switch is
set to “
1”, the lens cover opens and the lens moves
out. For this reason, take care to avoid touching the
lens when you switch the camera on.
1
When this function is enabled, the LCD monitor
switches off to conserve battery power if the camera
is not used in any way for 30 seconds (See P.98 for
details)
.
●
➀
●
➀
●
➁
●
➁
●
➂


