


25
Using the Camera
2
24
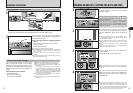
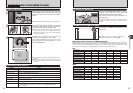
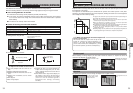
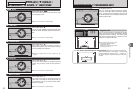
AF-ASSIST ILLUMINATOR
Press the shutter button down halfway in dimly lit
conditions. The camera fires the AF-assist
illuminator (green) to allow easier focusing.
Note that the effective range decreases for
telephoto shots.
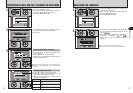
Position the AF frame in the center of the
viewfinder over the subject to set the focus.
If the subject is between 0.6 m and 1.5 m (2.0 ft.
and 4.9 ft.) away, the area marked by “■” in the
figure is photographed.
To take pictures using the viewfinder, press the
“DISP (BACK)” button to turn the LCD monitor off
(Turning the LCD monitor off conserves battery
power).
●
!
The viewfinder cannot be used to take shots in Macro mode.
●
!
For more precise shot framing, use the LCD monitor to take
the picture.
●
!
When the zoom is set to wide-angle, the end of the lens may
be visible in the viewfinder. This is normal and is not recorded
in the shot.
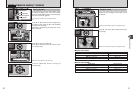
1
2
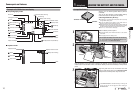
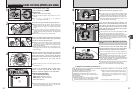
Brace your elbows against your sides and hold the
camera with both hands. Position of your right
thumb so that it is handy for using the zoom.
●
!
Moving the camera while shooting gives a blurred picture
(camera shake). Use a tripod to avoid camera shake,
particularly for shots in the dark when the selected flash
mode is Suppressed flash.
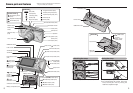
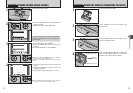
USING VIEWFINDER
VIEWFINDER LAMP DISPLAY
Display Status
Lit green Ready to shoot.
Blinking green AF/AE is in progress, camera shake warning or AF warning (Ready to shoot).
Blinking green and
orange alternately
Recording to xD-Picture Card (Ready to shoot).
Lit orange Recording to xD-Picture Card (Not ready).
Blinking orange Charging the flash (Flash will not fire).
Blinking green
(1-second intervals)
Camera in Power Save mode.
Lit red Battery charging is in progress.
Blinking red
i xD-Picture Card Warnings
No card loaded, card not formatted, incorrect format, card full, xD-Picture Card error.
i Lens operation error.
✽ Detailed warning messages appears on the LCD monitor (➡P.118, 119).
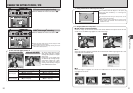
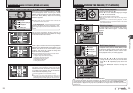
TAKING PICTURES
(
B AUTO MODE
)
STILL PHOTOGRAPHY MODE
●
!
The camera focuses most easily when a picture is taken at a
distance of around 2.5 m (8.2 ft.) with wide-angle zoom
setting.
3
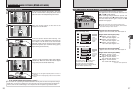
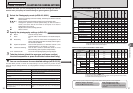
NUMBER OF AVAILABLE FRAMES
The number of available frames appears on the
LCD monitor.
●
!
See P.53 for information on changing the quality setting.
●
!
The default quality “y” set at shipment is “3”.
■ Standard number of frames per xD-Picture Card
The table below shows the standard number of frames for a new xD-Picture Card formatted on the camera. The larger the
xD-Picture Card capacity, the bigger the difference between the actual number of frames and the number shown here. Also,
the size of an image file varies depending on the subject. So the number of remaining shots may decrease by 2 or may
remain the same. For this reason, the number displayed may not show the actual number of frames.
STD
Quality setting
5 N
Number of recorded pixels
2832 × 2128
DPC-16 (16 MB) 10
3
2048 × 1536
19
2
1600 × 1200
25
1
1280 × 960
33
21 40 50 68
42 81 101 137
85 162 204 275
171
343
5 F
2832 × 2128
5
10
21
42
86
172
325
651
409
818
550
1101
~
2832 × 2128
1
2
4
9
19
39
DPC-32 (32 MB)
DPC-64 (64 MB)
DPC-128 (128 MB)
DPC-256 (256 MB)
DPC-512 (512 MB)
WIDE
Quality setting
¢ N
Number of recorded pixels
2816 × 1584
DPC-16 (16 MB) 14
£
2304 × 1296
20
™
2048 × 1152
22
¡
1536 × 864
30
28 41 44 61
57 84 90 124
115 169 181 249
231
462
¢ F
2816 × 1584
6
14
28
58
116
232
339
679
362
725
499
998
DPC-32 (32 MB)
DPC-64 (64 MB)
DPC-128 (128 MB)
DPC-256 (256 MB)
DPC-512 (512 MB)
AF frame