


113
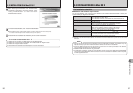
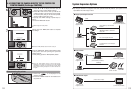
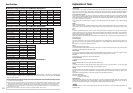
System Expansion Options
C
O
M
P
A
C
T
F
L
A
S
H
D
P
C
-
C
F
T
M
f
o
r
x
D
-
P
i
c
t
u
r
e
C
a
r
d
C
A
R
D
A
D
A
P
T
E
R
■
Image input/output to the PC
■
Print creation
■
Audio/Visual output
FinePix F710
Digital Camera
FinePix F710
Digital Camera
FinePix F710
Digital Camera
Printer
(
commercially available)
xD-Picture Card
xD-Picture Card
Digital Photo
Printer CX-550
TV monitor
(
commercially available)
(
Audio/visual output
)
(PC card slot)
Personal Computer
(commercially available)
Personal Computer
(commercially available)
Image Memory Card Reader
DPC-R1
PC Card Adapter DPC-AD
xD-Picture Card
™ USB Drive
DPC-UD1
CompactFlash™ Card Adapter
DPC-CF
(
USB
)
(
USB
)
(
USB
)
(
USB
)
PictBridge
eBy using the FinePix F710 together with other optional FUJIFILM products, your system can be
expanded to fill a wide range of uses.
112
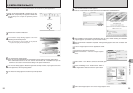
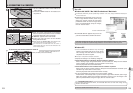
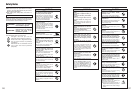
6.4 CONNECTING THE CAMERA DIRECTLY TO THE PRINTER FOR
PRINTING IMAGES
(
PictBridge FUNCTION
)
●
!
Press the “DISP (BACK)” button to cancel the printing.
Depending on the printer, the printing may not be canceled
immediately or printing may stop mid way through. When
printing stops mid-way, briefly turn the camera off and then
on again.
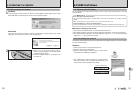
●
!
Press the “DISP (BACK)” button to return to step
5
.
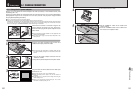
Press the “MENU/OK” button to download the data
to the printer and start printing the specified
number of prints.
To end printing, press the “DISP (BACK)” button.
Always press the “MENU/OK” button to complete
the settings.
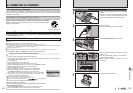
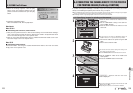
1Check that “ ” is not displayed on the
camera’s screen.
2Press the “POWER” button on the cradle to turn
the power off.
Disconnecting the printer
●
!
Movie images cannot be printed.
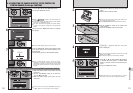
6
1Press “d” or “c” to display the frame (file) for
which you want to specify PRINT settings.
2Press “a” or “b” to set a value up to 99 as the
number of copies of the frame (file) to be printed.
For frames (files) that you do not want printed,
set the number of prints to 0 (zero).
To specify more DPOF settings, repeat steps 1
and 2.
3Press the “MENU/OK” button.
01 0302
7
8