


7574
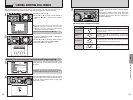
How to specify print options
(
DPOF
)
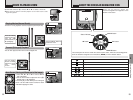
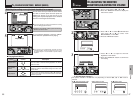
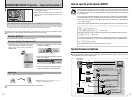
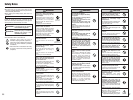
eBy using the FinePix M603 together with other optional FUJIFILM products, your system can
be expanded to fill a wide range of uses.
FinePix M603
Digital Camera
Video
output
xD-Picture Card
Personal Computer
(commercially available)
Digital Photo Printer
CX-400
TV monitor
(
commercially available)
USB
Cradle
Microdrive
(commercially available)
Video output
(PC card slot)
(commercially available)
PC Card Adapter
(USB)
(USB)
(PC card slot)
PC Card Adapter
Image Memory Card Reader
Image Memory Card Reader
(IEEE1394)
System Expansion Options
DPOF stands for Digital Print Order Format and refers to a format that is used for
recording printing specifications for images shot using a digital camera on media such
as xD-Picture Card. The recorded specifications include information on which frames
are to be printed.
This section gives a detailed description of how to order your prints with the FinePix M603.
On the FinePix M603, you can specify only one print per image in the DPOF settings.
✽ Note that some printers do not support date and time imprinting or specification of
the number of prints.
✽
Note that the warnings shown below may be displayed while you are specifying the prints.
©
ø (➡P.47, 80)
When you erase the image, the DPOF setting for that image is deleted at the same time.
¥ (➡P.50, 81)
If you load a media that contains frames specified for printing on another camera,
those print specifications are all reset and replaced by the new print specifications.
≈ (➡P.81)
Up to 999 frames can be specified on the same media.
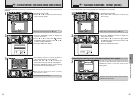
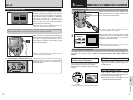
DISCONNECTING FROM THE PC
(
Important — always use this procedure.
)
1Quit all applications (FinePixViewer, etc.) that
are using the camera.
2Check that the indicator lamp is lit green (the
camera is not exchanging data with the
computer).
1
For a DSC connection, proceed to step 2. For a PC CAMERA connection, proceed to step 3.
●
!
In some cases, the camera and computer may still be communicating even after the “Copying” message
disappears from the computer screen. Always check that the indicator lamp is lit green.
Drag the “Removable drive” icon on the desktop to the Trash.
Macintosh
●
!
When you drag the icon to the Trash, “≠”
appears on the camera’s screen.
Switch the camera off and disconnect the special USB cable.
3
Perform the steps shown below before you switch the camera off. This procedure varies
depending on the operating system software (or PC) you are using.
No PC operation is required. Go ahead to step 3.
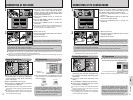
Windows 98/98 SE
Windows Me/2000 Professional/XP
2
3The menu option shown below appears.
Click on this option.
4The “Eject hardware” dialog box appears.
Click the [OK] button or the close button.
✽ Windows Me screen
2Left-click the Eject icon in the taskbar
and eject “USB Disk”.
1Right-click the removable disk icon in
the “My Computer” window and select
Eject. This step is only required in
Windows Me.
✽ Windows Me screen