


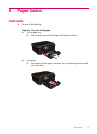

Control panel features
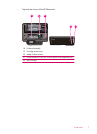
Figure 2-1 Control panel features
14
1 Home: Returns to the Homescreen (the default screen when you turn on the product).
2 Directional keys: Allow you to navigate through photos and menu options. Touch the right
arrow button to access the secondary Home screen.
3 Back: Returns to the previous screen on the display.
4 Photo: Opens the Photo menu.
5 Copy: Opens the Copy menu where you can select a copy type or change the copy settings.
6 Scan: Opens the Scan To menu where you can select a destination for your scan.
7 Cancel: Stops the current operation.
8 Help: Opens the Help menu on the display where you can select a topic to learn more about
it. From the Home screen, touching Help lists the topics for which help is available.
Depending on the topic you select, the topic will appear on the display or on your computer
screen. When viewing screens other than the Home screen, the Help button provides help
applicable to the current screen.
9 Setup: Opens the Setup menu where you can change product settings and perform
maintenance functions.
10 Snapfish: Opens Snapfish where you can upload, edit, and share your photos. Snapfish
may not be available depending on your country/region.
11 Ink: Shows estimated ink levels by cartridge. Displays a warning symbol if the ink level is
less than the minimum expected ink level.
12 Wireless: Opens the wireless menu where you can change the wireless settings.
13 Apps: Apps Manager provides a quick and easy way to access and print information from
the Web, such as maps, coupons, coloring pages, and puzzles.
14 ePrint: Opens the ePrint menu where you can turn the service on or off, display the printer
email address, and print an information page.
Chapter 2
8 Get to know the HP Photosmart