


Add Borders allows you to add one or more predefined borders to the displayed
image. To add a border:
1.
Use
to select Add Borders, then press .
2.
Use
to select a border type and preview the effect it has on the image.
– Soft Edge—Applies a soft, vignetted frame to the image.
– Inset Border—Image extends beyond the inset frame.
– Torn Edge—Creates random tears for an uneven border effect.
– Burned Edge—Creates a border with darkened areas that appear burned.
– Spatter—Creates an edge that appears to dissolve into the paper, like spray.
– Oval—Adds an oval matte border with beveled edges.
– Circle—Adds a circular matte border with beveled edges.
– Rectangle—Adds a rectangular matte border with sharp corners.
– Rounded Rectangle—Uses a rectangle with soft corners for the matte border.
– Square—Adds a square matte border with beveled edges.
3.
Press
to select the border and display the Creative sub-menu.
Follow the on-camera instructions to adjust the border.
4.
Press
to save a copy of the image with the specified border and return to the
Design Gallery Menu. Press
to exit the Creative sub-menu without saving and
return to the Add Borders sub-menu.
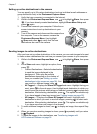
Cropping images
Crop allows you to crop the displayed image to the selected orientation, then use
the Zoom lever and
to ensure that the image content you want gets printed.
Tip Make sure you crop images as needed before adding borders, applying
artistic effects, or enhancing photos.
1.
Use
to select Crop, then press .
2.
Use
to select a crop orientation.
– Landscape (Default)—Horizontally crops the displayed image to a 3:2 aspect
ratio (one third wider than tall).
– Portrait—Vertically crops the displayed image to a 2:3 aspect ratio (one-third
taller than wide).
– Help—Provides extended help information for the Crop function.
3.
Press
to select the crop orientation and display the crop view.
Follow the on-camera instructions to use the Zoom lever and adjust what appears
in the cropped image.
When you print, the normal aspect ratios get cropped on the top and bottom
(landscape) or on the sides (portrait). Cropping helps ensure that the content you
want gets printed.
4.
Press
to save a copy of the cropped image and return to the Design Gallery
Menu. Press
to exit the Creative sub-menu without saving and return to the
Crop sub-menu.
HP Photosmart R837 Digital Camera 31