


E33
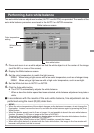
Performing Auto white balance
Two auto white balance adjustment modes (AUTO1 and AUTO2) are provided. The results of the
auto white balance procedure are stored in the AUTO1 or AUTO2 memories.
1.
Place and zoom in on a white object so that the white object is at the center of the image
(and fills 80% or more of the screen).
2.
Display the White balance screen.
3.
Set the color temperature to match the light source,
3200K: When using a light source with a low color temperature, such as a halogen lamp.
5200K: When using a light source with a high color temperature, such as sunlight.
4.
Set the White bal item to AUTO1 or AUTO2.
5.
Click the Auto white button.
● The KY-F75 automatically adjusts the white balance.
* When a slow the shutter speed has been selected, white balance adjustment may take a
while.
Ⅵ In accordance with the results of the auto white balance, fine adjustment can be
performed using the Level (R)/(B) slider bars.
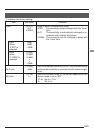
MEMO
• When the colour temperature of the subject changes as the darkness increases, do not change the
illumination. Instead, narrow the lens iris, and take the white balance again by pressing the [Auto
White] button.
• When the shutter speed is set to 2 sec or longer, it is not possible to launch the auto white balance
function. (However, 1.000 sec or longer at the time of V.SCAN.)
Temporarily return the shutter setting to a shorter value and launch the auto white balance function,
or set the item [White bal] to “MANUAL” or “PRESET”.
• Pressing the [Auto White] button in the FREEZE condition, cancels the freeze.
• When auto white balance is started with the Auto white button, the image in the live window will
become a still picture, but this is normal.
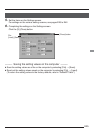
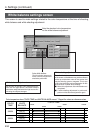
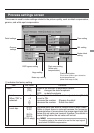
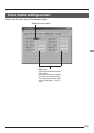
White balance screen
Color temperature
setting
White balance
item
Auto white button