


19
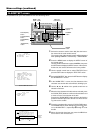
AUTO PAN SET screen
Menu settings (continued)
FOCUS
button
ZOOM
button
IRIS
button
buttonbutton
PAN/TILT
SETMENU
control lever
SETUP
MENU SET
SPEED
IRIS
AF
FOCUS
ZOOM
OPEN
FAR
TELE CLEAR
/HOME
7
4
1
8
0
5
2
9
6
3
ENTER
AUTOAUTO
PANPAN
OPTION
1
OPTION
2
CAMERACAMERA
POSI-
TION
AUTOAUTO
PATROLPATROL
CLOSE
NEAR
WIDE
AUTO F-1 F-2 F-3
PAN/TILTLENS
CAMERA/POSITION
CAMERA POSITION
REMOTE CONTROL UNIT REMOTE CONTROL UNIT
RM-P2580
ALARM
POWERPOWER
KEY LOCKKEY LOCK
button
CAMERA
button
ENTER
buttons
Numeric Key
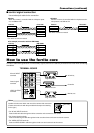
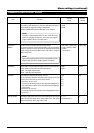
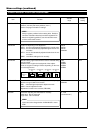
Auto pan is a feature which allows the camera to slowly move sideways automatically and is set per each camera.
There are 3 AUTO PAN modes: RETURN that goes back and forth between two points,
RIGHT that makes a right rotation and LEFT that makes a left rotation.
Picture at the
start position
Picture at the
stop position
Slow speed
SETUP
SETU
NIT..
P..POSI ITON
CAME AR..
CONT ORL U
SETUP
DE S
FOR
ELECT. .
ADJUST..
POSI . .
CAME ARMO
DEOI
CAME ARV
VIDEO A JD
.TEXT ED .TI
ET..AUTO PA SN
LSET..AUTO PA ORT
TTINGS. .FACT ROY ES
MODE
ITION
RETURN
NSET..
SET. .
AUTO PAN
PAN SETUATO
ITIOS
START PO
RETU NRSOP
SITION SETSTA TRPO
SITION SETRETU NRPO
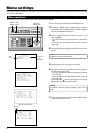
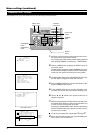
1.
Select the camera to set (See the instruction manual of the used
remote control).
Press CAMERA → Numeric Key → ENTER button to output the im-
age signal to the selected camera.
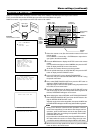
2.
Press the MENU button to display the SETUP screen of the remote
control.
Use the pan/tilt control lever to select CAMERA, then press the SET
button to display the SETUP screen of the camera.
At this time, the camera will move to the home position.
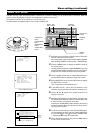
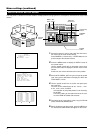
3.
Use the pan/tilt control lever to AUTO PAN SET, then press the SET
button to display the AUTO PAN SET screen.
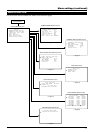
4.
In the AUTO PAN SET screen, select AUTO PAN MODE.
Select the auto pan mode from RETURN, RIGHT and LEFT using
the pan/tilt control lever.
5.
Next, select START POSITION SET, then press the SET button to
display the START POSITION SET screen.
Adjust the angle of view at the start position using the pan/tilt control
lever, IRIS, focus and zoom button.
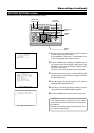
6.
Pressing the MENU button will display the AUTO PAN SET screen
and the set angle of view at the start position will be registered. At
this time, DATA SAVED will appear on the screen.
■ When selecting the mode to RETURN, set RETURN POSITION SET.
7.
Select RETURN POSITION SET, then press the SET button to dis-
play the RETURN POSITION SET screen.
Adjust the angle of view at the stop position, then press the MENU but-
ton. DATA SAVED will appear and the stop position will be registered.
MEMO
• Shifting in the direction of the tilt and lens operations cannot be
made at the stop position. To make field of view changes and lens
operations, press the SET button and set the stop position after
setting the field of view and making lens operations in the START
POSITION SETUP screen.
• Correct data will not be written when pressing the MENU button or
SET button while the camera is in motion. Always check to make
sure that the camera is still before pressing the MENU or SET button.
8.
When the start and stop positions have been set, press the MENU
button to return to the normal screen.
Remote control SETUP screen
Camera SETUP screen
START POSITION SET screen
RETURN POSITION SET screen
Example:
Action of Retun mode