DETAILED
OPERATION
97
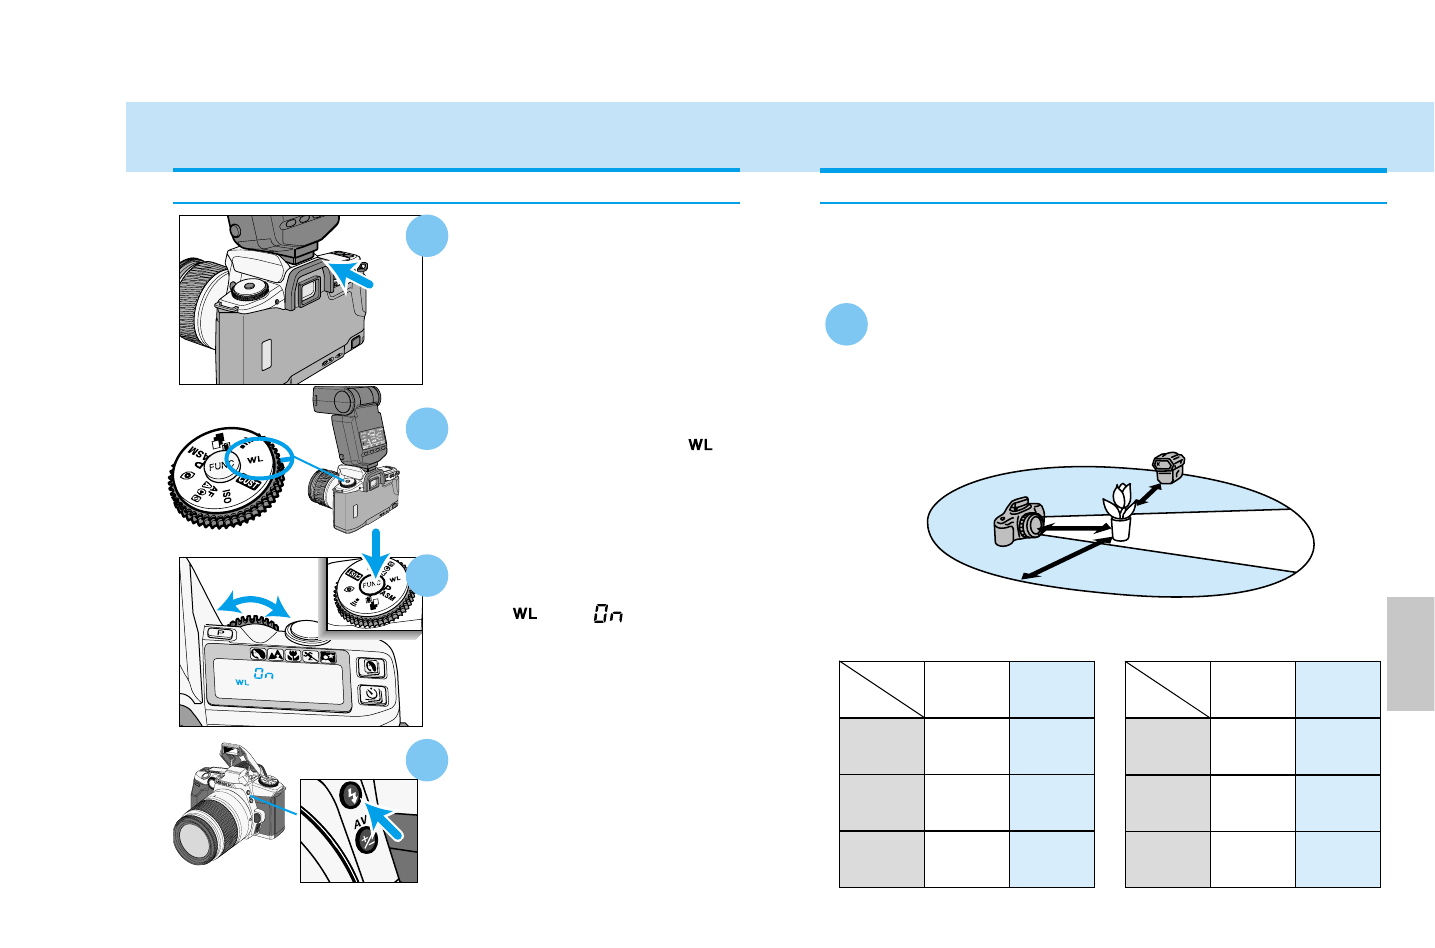
Position your camera and flash unit using the
information of this page.
• The example below is with the 3600HS (D) flash unit. For other flash
units, refer to the instruction manual for the correct camera to subject
and flash to subject distances.
• Photograph in dark locations.
Taking Pictures in Wireless/Remote Flash Mode
1
Flash-Subject
Distance
Camera-Subject
Distance
The remote/wireless flash may
not detect the control signals if
it is placed behind the subject.
Place the camera and flash unit
within a 5 m radius of the subject
The accessory flash is controlled by a light signal from the built-in flash.
Although the built-in flash fires, it does not add to the exposure, but
simply controls the accessory flash. The position of the camera and
flash is critical to control the lighting of the subject.
Continued on next page
Flash-mode
button
96
With the camera and flash on,
turn the function dial to .
While pressing the function
button, turn the control dial
until and appear on
the camera’s data panel.
Detach the accessory flash,
then press the camera’s
flash-mode button to raise
the built-in flash.
Attach the accessory flash to
the camera before turning the
flash and camera on.
•
The flash must be mounted on the
accessory shoe because the camera
needs to send a signal to the flash to
turn on its wireless/remote function.
2
Setting Wireless/Remote Flash Mode
1
4
3
WIRELESS/REMOTE FLASH
1.4 - 5.0m /
4.6 - 16.4 ft.
f/2.8
f/4
f/5.6
1.4 - 5.0m /
4.6 - 16.4 ft.
1.0 - 5.0m /
3.3 - 16.4 ft.
1.0 - 5.0m /
3.3 - 16.4 ft.
1.0 - 3.5m /
3.3 - 11.5 ft.
1.0 - 2.5m /
3.3 - 8.2 ft.
camera-
subject
distance
Flash-
subject
distance
Aperture
2.8 - 5.0m /
9.2 - 16.4 ft.
f/2.8
f/4
f/5.6
2.8 - 5.0m /
9.2 - 16.4 ft.
2.0 - 5.0m /
6.6 - 16.4 ft.
2.0 - 5.0m /
6.6- 16.4 ft.
2.0 - 5.0m /
6.6 - 16.4 ft.
2.0 - 5.0m /
6.6 - 16.4 ft.
camera-
subject
distance
Flash-
subject
distance
Aperture
ISO 100
ISO 400


