


72
Wireless Transfer and Printing
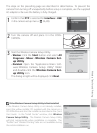
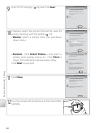
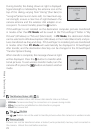
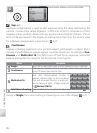
During transfer, the dialog shown at right is displayed.
Signal strength is indicated by the antenna icon at the
top of the dialog, varying from “strong” (four bars) to
“no signal” (antenna icon turns red). For maximum sig-
nal strength, ensure a clear line of sight between the
camera antenna and the wireless LAN adapter or ac-
cess point. To cancel transfer, press the button.
If PictureProject is not installed on the destination computer, pictures transferred
in modes other than PC Mode will be saved to the “PictureProject” folder in “My
Pictures” (Windows) or “Pictures” (Macintosh). In PC Mode, the destination folder
can be selected in Windows Explorer (Windows) or the Finder (Macintosh) and pic-
tures transferred via drag and drop. If PictureProject is installed, pictures transferred
in modes other than PC Mode will automatically be displayed in PictureProject
after transfer, and the destination directory can be changed in the PictureProject
“Transfer Options” dialog.
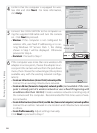
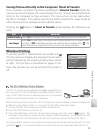
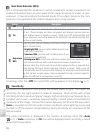
When transfer is complete, the message shown at right
will be displayed. Press the
button to transfer addi-
tional pictures. To exit wireless transfer mode, turn the
camera off or press the button and select another
mode.
Cancel
Transferring images to computer
0002/0006
Shooting Date
TRANSFER COMPLETED
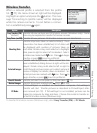
The Wireless Status LED ( 2)
The camera wireless status LED shows data transfer status as follows:
• LED blinks: Camera searching for connection or in power-saving mode
• LED on: Connection established or data transfer in progress
• LED off : Not connected
The ( ) Button
The ( ) button can not be used to transfer pictures when the camera is in wireless mode.
Memory Cards
Pictures can not be transferred when a locked (write-protected) memory card is inserted in
the camera. Unlock the card before insertion.