


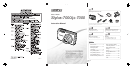


3 EN 4 EN 69EN
Please read “Menu Settings” (p. 25 to 42) while referring to this page.
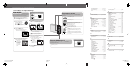
Using the FUNC Menu (p. 22)Using the FUNC Menu (p. 22)
Frequently used shooting menu functions can be set with fewer
steps using the FUNC menu.
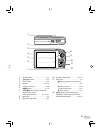
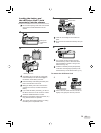
Using the Direct Buttons Using the Direct Buttons
Frequently used shooting functions can be accessed using the
direct buttons.
Shutter button (p. 14)
Zoom button (p. 19)
F
button (exposure compensation) (p. 20)
&
button (macro) (p. 20)
#
button (fl ash) (p. 19)
Y
button (self-timer) (p. 21)
q
button (playback) (p. 32)
g
/
E
button (change information display/
menu guide/check date and time) (p. 21, p. 3,
p. 13)
H
/
S
button (panorama/Shadow Adjustment
Technology/multi window/backlight boost/erase)
(p. 22, p. 16)
E
button (p. 3, p. 22)
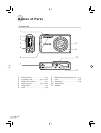
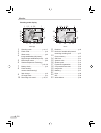
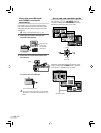
Buttons in use
Arrow pad
E
button
m
button
Buttons in use
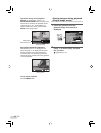
4
Use
LM
to select the desired
submenu 1, and press the
E
button.
1
2
ISO
OFF
OFF
CAMERA MENU
AUTO
o
FINE ZOOM
DIGITAL ZOOM
DRIVE
AUTOWB
MENU
EXIT SET
OK
1
2
ISO
OFF
OFF
CAMERAMENU
AUTO
o
FINEZOOM
DIGITALZOOM
DRIVE
AUTOWB
MENU
SET
OK
BACK
DIGITAL ZOOM
OFF
ON
Page tab Submenu 2
To quickly move to the desired submenu,
press
N
to highlight the page tab, and then
use
LM
to move the page tab. Press
O
to return to the submenu 1.
Some menus include submenus that
appear by pressing the
E
button.
5
Use
LM
to select the submenu 2,
and press the
E
button.
Once a setting is selected, the display
returns to the previous screen.
There may
be additional
operations. “Menu
Settings” (p. 25 to
42)
6
Press the
m
button to complete
the setting.
●
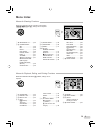
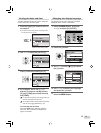
Three Ways to Adjust Settings
E
button
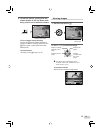
Using the MenuUsing the Menu
Various camera settings can be accessed through the
menus, including functions used during shooting and
playback and the date/time and screen display.
Some menus may not be selectable due to
combinations of functions that have been set or
the selected
s
mode (p. 17).
1
2
ISO
OFF
ON
CAMERA MENU
AUTO
o
FINE ZOOM
DIGITAL ZOOM
DRIVE
AUTOWB
MENU
EXIT SET
OK
Arrow pad
E
button
1
Set the mode dial to
one of the selections.
The symbol in
“Menu Settings” (p. 25 to
42) indicates available shooting modes.
2
Press the
m
button.
This example describes how to use the
menus to set the [DIGITAL ZOOM].
CAMERAMENU
MENU
EXIT SET
OK
Shooting mode top menu
3
Use
LMNO
to select the desired
menu, and press the
E
button.
Pressing and
holding the
E
button displays
an explanation
(menu guide)
of the selected
option.
ISO
OFF
OFF
1
2
CAMERA MENU
SET
OK
AUTO
o
FINE ZOOM
DIGITAL ZOOM
DRIVE
AUTOWB
MENU
EXIT
Submenu 1
●
Information display......................p. 21, 23
Internal memory .......................... p. 11, 57
ISO....................................................p. 26
L
Lithium-ion battery ..................p. 2, 10, 55
M
MACRO ............................................p. 20
MEMORY FORMAT ....................p. 37, 51
MENU COLOR .................................p. 38
microSD Attachment ...............p. 2, 12, 58
microSD card ..............................p. 12, 58
Monitor brightness
s
.....................p. 40
Movie
A
.....................................p. 15, 18
MTP ............................................p. 48, 49
MULTI WINDOW ..............................p. 22
N
NTSC ................................................ p. 41
Number of storable pictures..............p. 57
O
OLYMPUS Master 2 ...............p. 2, 29, 49
Optical zoom .....................................p. 19
P
PAL ...................................................p. 41
PANORAMA ......................................p. 29
PERFECT FIX ..................................p. 32
PIC ORIENTATION ...........................p. 40
PictBridge .........................................p. 43
PIXEL MAPPING ..............................p. 39
Playback
q
...............................p. 15, 54
PLAYBACK MENU .......................p. 5, 35
POWER SAVE ..................................p. 42
PRINT ORDER ...........................p. 36, 46
Protecting images
0
.....................p. 35
PW ON SETUP .................................p. 37
R
REC VIEW ........................................p. 38
REDEYE ........................................... p. 19
REDEYE FIX ....................................p. 32
RESET ..............................................p. 31
Resize
Q
........................................ p. 33
Rotating images
y
...........................p. 35
S
Saturation .........................................p. 34
s
(SCENE MODE) ................p. 17, 28
Self-timer ..........................................p. 21
Sepia.................................................p. 34
Sequential shooting ..........................p. 26
SETUP ..............................................p. 37
SHADOW ADJ ......................p. 22, 28, 32
Shooting still picture
K
...................p. 14
SHUTTER SOUND ...........................p. 38
Shutter speed ...................................p. 14
SILENT MODE .................................p. 42
Single-frame shooting .......................p. 26
Sleep mode.......................................p. 50
SLIDESHOW ....................................p. 32
Sound recording
R
...............p. 18, 27, 36
SOUND SETTINGS ..........................p. 38
SPARKLE EYE .................................p. 33
SPOT (AF MODE) ............................p. 27
Spot
n
(ESP/
n
) ..........................p. 27
Strap .................................................p. 10
SUPER MACRO ...............................p. 20
U
USB Cable ..............................p. 2, 43, 48
V
VIDEO OUT ......................................p. 41
Volume ........................................p. 16, 38
W
Warning sound
8
............................p. 38
WB .................................................... p. 26
X
xD-Picture Card .......................... p. 11, 56