


User’s Manual
BX-AL133
For more information, please visit our website at:
http://www.OptomaUSA.com
User’s Manual | 5
Plan Your Installation
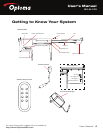
The lens assembly may be mounted in one of two ways:
1. To the ceiling or projector mount above the projector
2. To a shelf or table below the projector
When attaching the motor assembly to the ceiling, use a board, plate or lens-enabled projector mount
that is attached to ceiling joists or studs. Sheetrock embedded fasteners can and will become loose
with repeated lens movement, causing the mechanism to fall, resulting in possible severe injury.
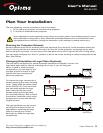
Planning for Projector Exhaust
Some projectors have hot air exhaust ports that discharge from the front. Avoid situations where the
lens or housing will block or obstruct the warm air flow out of the projector, as damage to the bulb
and/or the lens may result. You can mount the sled either to the left or right of the lens. During setup,
you can easily configure the “lens-in” position to be on the motor housing or pulley housing side of the
sled. (See Setup).
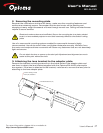
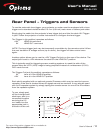
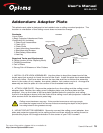
Changing Orientation of Logo Plate (Optional)
The lens sled is configured for ceiling mounted operation as shipped. As such, the
logo reads right side up with the mounting bar on top. If you are using the
sled in a table or shelf mounted
configuration, you will want to turn
the logo around so that it is right
side up with the mounting bar
below the projector.
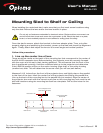
To reverse the logo, remove the 4
screws securing the motor housing
cover. Lightly slide the sheet metal
cover and lift it off. Once removed,
you can easily access the logo
plate. Remove the two small
screws securing the logo plate,
turn the plate around, and re-install
the screws. Install the motor cover
housing back on the sled with the
original screws.
The logo backlight may be turned
off using the remote control. An
alternative to reversing the logo
plate is to simply turn off the
back light to make the logo less
conspicuous.
Remove
Screws
Rotate Logo
Upright
Remove Screws
Replace Screws