


User’s Manual
BX-AL133
For more information, please visit our website at:
http://www.OptomaUSA.com
User’s Manual | 7
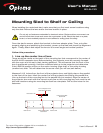
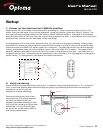
2. Securing the mounting plate
Because the mechanism and lens are heavy, make sure the mounting fasteners and
surface are extremely secure. Remember that the sled motor will be starting and
stopping a heavy weight thousands of times through normal use. Ceiling mounted lenses
require a secure surface.
Sheetrock anchors alone are insufficient. Secure the mounting bar to a plate, painted
board, or lens-enabled projector mount that is securely affixed to the studs or ceiling
joists.
Use of a commercial mounting system enabled for anamorphic lenses is highly
recommended. Use all six screw holes, and tighten fasteners securely. Vibration from
the motor and reciprocal lens movement will loosen any fasteners that are not absolutely
tight and secure.
Do not attach the lens or power up the sled yet! Adjustment and alignment are much
easier at this point without the lens.
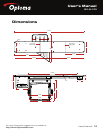
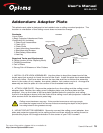
3. Attaching the lens bracket to the adaptor plate
Remove the bracket mounting screws from the inside holes in the adaptor plate and
use them to attach the lens bracket supplied with the Optoma BX-AL133 anamorphic
lens system. If the lens is attached to the bracket, make sure to remove the lens prior to
attaching to the lens adaptor plate.
Holes for Ceiling or Plate
Mount (x6) Fasteners
Lens Bracket Screws (x4)