


27
Audio recording
1
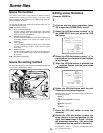
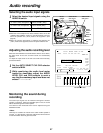
Select the desired input signals using the
AUDIO IN switch.
To use the front microphone
i
Select FRONT (MIC).
To use the rear microphone
i
Select REAR (MIC).
To use the audio products
i
Select REAR (LINE).
AUDIO
SELECT
switch
AUDIO IN
switch
PHONES
jack
Mic power switch
<Note>
≥When the front microphone has been selected, select ON as the
<FRONT MIC POWER> setting for the MIC/AUDIO sub-menu
item if the phantom mic (+48 V) needs to be supported. (See
page 35)
≥When the exterior microphone is selected and phantom mic
(+48 V) needs to be supported, set the mic power switch to ON.
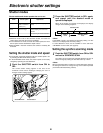
When the AUTO SELECT CH1/CH2 selector switch is set to AUTO,
the input levels of the CH1 and CH2 sound are automatically
adjusted.
To adjust the input levels of the CH1 and CH2 sound manually,
proceed as follows:
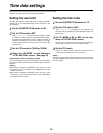
The audio input signals can be monitored through the monitor
speaker or earphone. When the PHONES jack is used, no sound
will be heard through the monitor speaker.
The volume of the monitored sound can be adjusted using the
MONITOR control.
<Note>
Howl may be caused if the volume of the audio monitor speaker is
too high. In a this situation, rotate the audio monitor level control to
a lower level which does not give rise to howl.
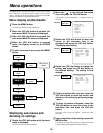
Monitoring the sound during
recording
Selecting the audio input signals
Adjusting the audio recording level
1
Set the AUTO SELECT CH1/CH2 selector
switch to MAN.
AUDIO LEVEL
CH1 control
Monitor
speaker
AUDIO LEVEL
CH2 control
2
While monitoring the audio level meter
inside the viewfinder, adjust the AUDIO
LEVEL CH1 and CH2 controls in such a
way that the maximum input level does not
exceed “- - - - - + - - +.”
JOG dial button MONITOR control
EX TAPE NEAR END FLUO.
48K
CH2
iREC TCG 12:34:56:00
0
dB
1100 LOW LIGHT
DJan-01-01 23:59:00
=========
¢¢¢
min
13.4V
Z78
ATW
F56
CH1
AWB+02
32K
.
.
SPOT QUICK FOCUS
¢1¢¢¢¢¢¢¢¢¢¢¢¢¢¢¢¢
¢2¢¢¢¢¢¢¢¢¢¢¢¢¢¢¢¢
FL1
/
CH1
CH2
–32 –28 –24 –20 –16 –12 –8 –4 0dB
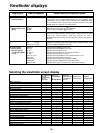
The reference value