


– 125 –
Chapter 6 Thumbnail Operations for Clips — Thumbnail operations
2
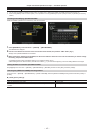
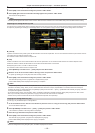
Select desired format ([TYPE S], [FAT]) in the main menu → [CLIP] → [FORMAT(STORAGE)] and press the <SET> button.
3
Select [YES] in the confirmation message and press the <SET> button.
4
Select [YES] again when the confirmation message appears and press the <SET> button.
This formats the storage device.
@@
NOTE
t Formatting the storage devices erases all of its contents. Data cannot be recovered once it is formatted. Always check the data before formatting.
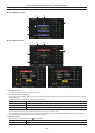
Exporting to a storage device by card
You can export to a storage device (write to a storage device from a P2 card) by P2 card. The copy results and the maximum number of items that can
be copied vary depending on format type of the storage device. You cannot perform copying once the capacity of the storage device is exceeded.
r [TYPE S]
A partition is created for each [TYPE S] card. All data included in the card are copied there. You can check the serial number and part number of the P2
card copied using the camera’s explorer screen.
The maximum number of items that can be copied is 23.
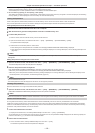
r [FAT]
A folder is created for each card. All data included in the card are copied there. You can check the folder names in the camera’s explorer screen.
Folders are created in 2 levels; the date folders on the rst level and the time folders on the second.
Example) August 30, 2013, 12:34:56: /13-08-30/12-34-56
The maximum number of items that can be copied is 100.
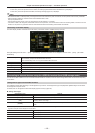
1
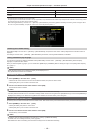
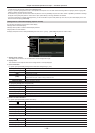
Select [EXPORT] in the main menu → [CLIP] and press the <SET> button.
2
Move the cursor to the card slot number of the copy source and press the <SET> button.
For [TYPE S], selecting [ALL SLOT] exports all cards currently inserted.
3
Select [YES] in the confirmation message and press the <SET> button.
This starts the exporting process. A progress bar is displayed during export.
[COPY COMPLETED!] will be displayed when exporting is completed.
@@
NOTE
t For export with [TYPE S], P2 card data and copied data can be veried (compared) automatically after exporting. Verication at the time of export
is enabled in the factory setting. When you set to disable verication at the time of export, exported data is not veried, and the time until export
completes will shorten. To disable verication, set [VERIFY] to [OFF] in the main menu → [CLIP] → [STORAGE COPY SETUP]. For [FAT], verication
is not performed regardless of this setting.
t To cancel the export process, press the <SET> button. A [CANCEL] conrmation message will appear. Select [YES] and press the <SET> button.
t Even if you cancel the process during verication, copying to the P2 card will continue until it is completed.
t microP2 memory cards that exceed 32 GB cannot be exported and imported. Use copied clips.
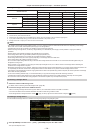
Copying to a storage device by clip
You can copy only the selected clips to a storage device.
1
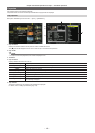
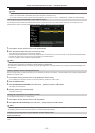
Go to the thumbnail screen. Use the cursor buttons to place the cursor on a clip you want to copy and press the <SET> button.
You can also select multiple clips.
2
Select [STORAGE] in the main menu → [CLIP] → [COPY] and press the <SET> button.
A list of folders or partitions in the storage device is displayed.
3
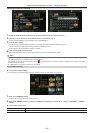
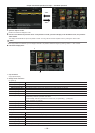
Select the copy destination and press the <SET> button.
4
Select [YES] in the confirmation message and press the <SET> button.
This starts the copying process. A progress bar is displayed during copying.
[COPY COMPLETED!] will be displayed when copying is completed.
@@
NOTE
t When the storage device has a [FAT] le system, the folders displayed are as follows: