Connecting to other equipment
101
VQT0V63
• Connect the USB connection cable with
the [ ] mark facing the [1] mark on
the [DIGITAL] socket.
• Hold the USB connection cable at C
and insert straight in or take straight
out.
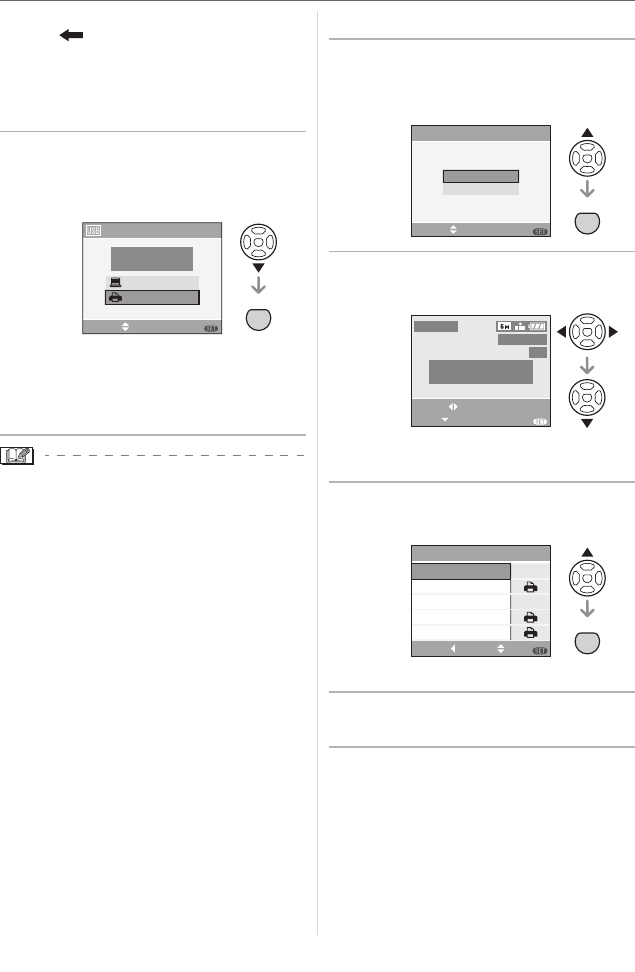
3 Press 4 to select [PictBridge
(PTP)] and then press [MENU/
SET].
• If you set [USB MODE] in the [SETUP]
menu to [PictBridge (PTP)] in advance,
it is not necessary to set this every time
you connect to a PC. (P23)
• Do not use any other USB connection
cables except the supplied one.
• To print the age in [BABY1]/[BABY2]
(P64) in scene mode or the departure
date for [TRAVEL DATE] (P66), use the
software [LUMIX Simple Viewer] or
[PHOTOfunSTUDIO-viewer-] in the
CD-ROM (supplied) and print from the
PC. For information about this, refer to the
separate operating instructions for PC
connection.
• To find out more about PictBridge
compliant printers, contact your local
dealer.
∫ Single picture
1 Press 3 to select
[SINGLE PICTURE] and then
press [MENU/SET].
2 Press 2 1 to select the picture
and then press 4.
• The message disappears in about
2 seconds.
3 Press 3 to select [PRINT START]
and then press [MENU/SET].
• Press [MENU/SET] to cancel printing.
4 Disconnect the USB connection
cable after printing.
USB MODE
SELECT SET
MENU
PC
PLEASE SELECT
THE USB MODE
PictBridge(PTP)
MENU
SET
SELECT SET
DPOF PICTURE
SINGLE PICTURE
PictBridge
MENU
MENU
SET
PLEASE SELECT
THE PICTURE TO PRINT
PictBridge
1/3
100
_
0001
EXIT
SELECT
PRINT
MENU
MENU
SET
OFF
SINGLE PICTURE
NUM. OF PRINTS
1
PRINT WITH DATE
PAPER SIZE
PAGE LAYOUT
SELECTCANCEL EXIT
MENU
PRINT START


