


14
LSQT1211
Before using
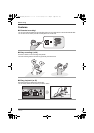
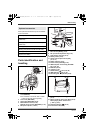
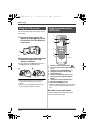
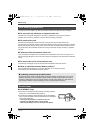
You can record the image while viewing it on the
LCD monitor.
1 Place your finger on the LCD
monitor open part A and pull the
LCD monitor out in the direction
of the arrow.
≥ It can open up to 90o.
2 Adjust the angle of the LCD
monitor as desired.
≥ It can rotate up to 180o A towards the lens or
90o B towards the opposite direction.
≥ The brightness and colour level of the LCD
monitor can be adjusted from the menu.
(l 32)
≥ The unit may be damaged or fail if the LCD
monitor is forcibly opened or rotated.
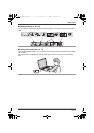
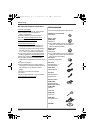
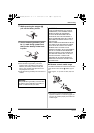
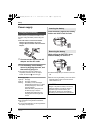
1 Photoshot button [PHOTO SHOT, ]*
2 On-screen display button [EXT DISPLAY]
(l 73)
3 Date/time button [DATE/TIME] (l 31)
4 Playback operation buttons (l 56)
5 Delete button [ ]*
6 Direction buttons [3,4,2,1] (l 30)
7 Recording start/stop button [START/
STOP]*
8 Zoom/volume buttons [ZOOM, VOL]*
9 Menu button [MENU]* (l 30)
10 Enter button [ENTER] (l 30)
* means that these buttons function in the same
manner as the corresponding buttons on the
unit.
∫ Install a button-type battery
Install the supplied button-type battery in the
remote control before using it.
Using the LCD monitor
A
AB
Using the remote control
(SDR-H250)
ZOOM
START/
STOP
PHOTO
SHOT
EXT
DISPLAY
DATE/
TIME
VOL
PLAY
STOPSKIP SKIP
MENU
ENTER
PAU SE
SEARCH
STILL ADV STILL ADV
SEARCH
1
2
3
4
6
7
8
9
1
0
5
LSQT1211(PAL_ENG).book 14 ページ 2007年2月13日 火曜日 午後1時14分