10 C2462M-D (3/08)
IN-CEILING INSTALLATION: SUSPENDED CEILING
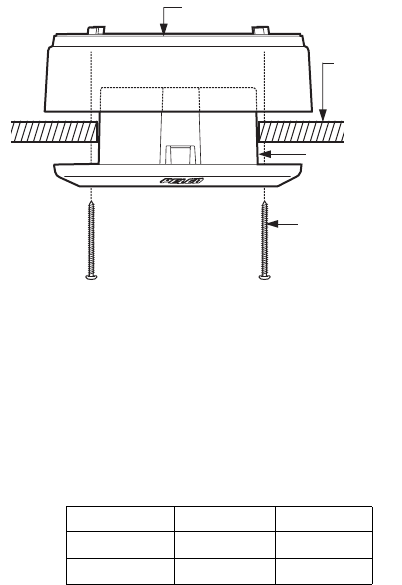
Refer to Figure 4 and complete the following steps.
1. Remove the ceiling tile from the ceiling.
2. Cut a 4-inch diameter hole in the ceiling tile.
3. Remove the surface mount ring from the back box. Refer to Figure 5 and complete the following
steps:
a. Place your fingers on the circular marks located on the sides of the surface mount ring.
b. Pinch the sides.
c. Lift and remove the surface mount ring from the back box.
NOTE: Do not discard the surface mount ring because it is required to complete the installation.
4. Turn the surface mount ring upside down and place it on the inside of the ceiling tile.
5. Attach the back box to the ceiling tile and surface mount ring with two 10-32 x 1.50-inch self-
tapping screws (supplied).
Figure 4. Ceiling Tile Installation
6. Replace the ceiling tile.
7. Remove an adjacent ceiling tile and connect the video cable/wires.
BNC: Connect the BNC connector from the Camclosure to a mating BNC connector.
Twisted pair: Connect the blue wire to Video +; connect the gray wire to Video -.
8. Connect the power wires.
Table B. Power Input: Suspended Ceiling Installation
Voltage Red Wire Black Wire
12 VDC + Ground
24 VAC ~ ~
10-32 x 1.50
SELF-TAPPING
SCREWS
(SUPPLIED)
BACK BOX
CEILING
TILE
SURFACE MOUNT RING


