8 Pelco Manual C480M-F (10/04)
3.7 CAMERA/LENS INSTALLATION
Now that the proper window viewing location has been determined and the enclo-
sure has been mounted, you are ready to mount your camera lens to the enclosure.
Refer to the following steps.
1. Loosen the tilt table mounting bolts.
2. Securely attach the camera/lens to the desired location on the tilt table.
3. Make all necessary electrical connections (video, camera power, etc.).
4.. Position the tilt table at the desired location and angle, and tighten the hard-
ware.
5. Close the lid to ensure that there is no interference.
6. Provide power to the camera and check for adequate video image.
3.8 TAMPER SWITCH INSTALLATION
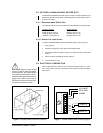
The HS8000 enclosures come standard from the factory with a tamper switch in-
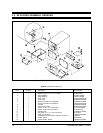
stalled. Should it become necessary to install a replacement switch, refer to Figure
6 for the correct position of the bracket/switch and perform the following steps:
1. Remove the front cover.
2. Install the bracket/switch and secure with lockwashers and nuts.
3.8.1 Wiring the Switch
The tamper switch comes with both a “Normally Open” contact and a “Normally
Closed” contact.
For a “Normally Open” circuit, use the “open” and “common” terminals; for a “Nor-
mally Closed” circuit, use the “closed” and “common” terminals.
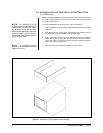
NOTE:
The tilt table bracket and tilt
table may be removed from the en-
closure to aid in camera/lens instal-
lation.


