


20
21
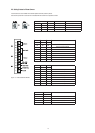
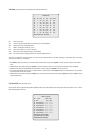
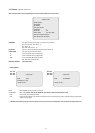
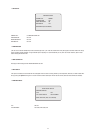
3.9 Alarm (This menu shows on only specic model, Fifth Item of Main menu)
ALARM SETUP
NO PRI PRS IN OUT HLD LATCH
01 1 001 OFF OFF 03 OFF
02 8 001 OFF OUT1 03 OFF
03 1 240 NO OUT1 03 OFF
04 2 001 NC OUT4 03 OFF
05 1 001 OFF OFF 03 OFF
06 8 001 OFF OUT1 03 OFF
07 1 240 NO OUT1 03 OFF
08 2 001 NC OUT4 03 OFF
SAVE AND EXIT (ESC TO CANCEL)
NO : Alarm input number
PRI : Lower No. has higher priority, Equal priority alarms will be serviced repeatedly.
PRS : Stored preset number to be called by alarm.
IN : NO/NC - normally open /Closed OFF - ignore
OUT : OUT1~OUT4 - Relay out 1,2,3,4, OFF - No output.
HLD : Alarm will be held for programmed time (01 to 99 seconds)
LATCH : ON - Shows all alarms including past alarm, OFF - Shows activated alarms only.
There is one „0” PRIO which is the highest priority. „0” priority can choose Autoscan, Pattern or Tour. When responding „0” priority alarm, there is no respond
other alarm until nishing „0” priority action
1. Press Menu to display the main menu on the monitor. Select the Alarm option by pushing the Joystick up or down and push to right to enter the detail
menu.
2. Select the alarm input number by pushing the Joystick up or down and select the column you wish to setup. Selected position will be highlighted.
3. Select the Preset, Status of Input (NC/NO/OFF), and Output (OUT1~4/OFF) by pushing the Joystick to the right or to the left.
4. To increase or decrease the preset number or to change the status or output number, twist the Joystick clockwise or counterclockwise. In case of preset,
programmed preset number will be scrolled.
5. Select the Save and Exit option by pushing the Joystick up or down. Save and exit the program by pushing the Joystick to the right. Press ESC to exit the
program without saving.
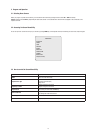
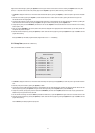
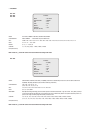
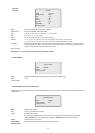
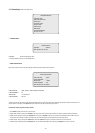
3.10 Area Title (Sixth Item of Main menu)
Enter a specic name on programmed angle between START and END. For the screen below, when the camera points at an angle between 124.3° to 359.5°,
ABC will be displayed on the screen.
AREA TITLE SETUP
NO TITLE START END
01 ACB 124.3 359.5
02 xxxxxxxxxxxxxxxx ===== =====
03 xxxxxxxxxxxxxxxx ===== =====
04 xxxxxxxxxxxxxxxx ===== =====
05 xxxxxxxxxxxxxxxx ===== =====
06 xxxxxxxxxxxxxxxx ===== =====
07 xxxxxxxxxxxxxxxx ===== =====
08 xxxxxxxxxxxxxxxx ===== =====
SAVE AND EXIT (ESC TO CANCEL)
HOLD DOWN CTRL KEY TO MOVE
PANNING AND SET AREA ANGLE.