


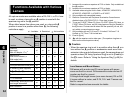

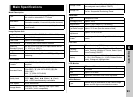

6
88
Appendix
The following functions are available when the optional GPS
unit O-GPS1 is attached to this camera.
t Memo
• Refer to the manual of the GPS unit for details on how to
attach the unit and information on the unit’s functions.
• To display [Electronic Compass], refer to “Shooting Info
Display” (p.12).
u Caution
• “Simple Navigation” cannot be used with this camera.
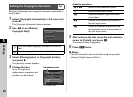
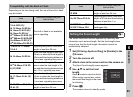
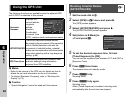
1 Set the mode dial to M.
2 Select [GPS] in A2 menu and press D.
The [GPS] screen appears.
3 Select [ASTROTRACER] and press D.
The [ASTROTRACER] screen appears.
4 Set [Action in B Mode] to
a and press E.
5 To set the desired exposure time, first set
[Timed Exposure] to [ON].
You can set the exposure time between 0'10" and 5'00" in
[Exposure Time].
6 Press F three times.
The camera returns to standby mode.
7 Press 0 fully.
Shooting starts.
8 Press 0 fully again.
Shooting stops.
When [Timed Exposure] is enabled, shooting ends
automatically after the set time has elapsed.
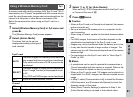
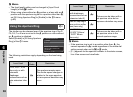
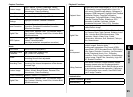
Using the GPS Unit
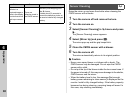
Electronic
Compass
Displays the
current latitude,
longitude,
altitude,
direction,
Coordinated
Universal Time
(UTC), capture mode, and exposure value.
ASTROTRACER
Tracks and captures celestial bodies.
By matching the movement of the camera’s
built-in Shake Reduction unit with the
movement of celestial bodies, celestial
bodies can be captured as individual points
even when shooting with a long exposure
setting. (p.88)
GPS Time Sync
Automatically adjusts the camera’s date
and time settings using information
acquired from GPS satellites.
1/
250
1/
250
F5.6F5.6 16001600 0.00.0
10:00:0010:00:00
0°
N
36°45.410'N
36°45.410'
W140°02.000'W140°02.000'
89m89m
07/07/201407/07/2014
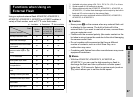
Shooting Celestial Bodies
(ASTROTRACER)
A2
ASTROTRACER
ASTROTRACER
Action in B Mode
Action in B Mode
Precise Calibration
Precise Calibration
Timed Exposure
Timed Exposure
Exposure Time
Exposure Time
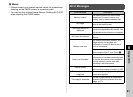
GPS LED Indicators
GPS LED Indicators