


13
Operation
6. Click
Preview
. The scanner scans
the object and displays a preview
using the options you selected.
7. Review the image to make sure it is
what you want. Readjust the set-
tings if necessary.
8. To see a preview again before scan-
ning the final image, click
Preview
.
9. When you are satisfied with the
image settings, click
Scan
.
The scanner starts scanning the
object, and a progress bar appears
showing the percentage completed.
When the scan is complete, the scanned
image appears in the destination soft-
ware.
USING THE TWAIN
BUTTON
Instead of using the scanner's buttons or
PaperPort software, you can use the
supplied Twain software to control your
scanner. This lets you scan many types
of objects, from small business cards to
A4-sized pages.
Note:
Your scanner is initially set to
scan from the PaperPort software with
the setting
Color Document
—
Faster
. To
scan a black-and-white image, select
one of the other settings. To scan at a
higher resolution for a color image, se-
lect
Color
Document
—
Better
Quality
.
However, scanning at a higher resolu-
tion creates a larger file size and takes
longer to scan. To minimize the file size
and the time required to get a better
quality scan, select just the area of the
object that you want to scan.
Follow these steps to scan using the
Twain button.
1. Open the document cover and place
the object to scan facedown on the
glass. Then close the cover.
2. If the PaperPort software is not cur-
rently running, double-click the
PaperPort icon on the Windows
desktop to start it. The
PaperPort
Desktop
appears.
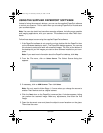
3. Click the
Twain
icon on the com-
mand bar or click
Acquire
on the
File
menu. The
USB Scanner
dialog
box appears.
Note:
When scanning from other
Twain software, choose
Acquire
or
Scan
from the
File
menu. Other
Twain software will usually not have
a
Twain
button.
4. Adjust the desired Twain options.
Scan Page For
— Select one of
these preset options if you want to
use it for scanning. These options
are optimized for the various uses of
scanned images, such as scanning
for editing text or scanning in color.
For more information about these
settings, see “Pre-Defining Scan
Settings” on Page 17. If you do not
want to use one of these preset
options, you can manually select the
scan configuration options. Note
that when you select a preset
option, scan configuration settings
are for that preset option. You can
also create your own custom config-
urations. See the Help information
for details.
25-3050.fm Page 13 Wednesday, February 16, 2000 9:42 AM