


17
Configuring the Scanner
Note:
If you click
COPY/PRINT
or
FAX
, the dialog box for editing and adjusting the set-
tings will have a Device tab for selecting options for a printer or copier. See the Help
menu for more information.
PRE-DEFINING SCAN SETTINGS
Selecting the proper scan setting before final scanning provides the best results. The
scan setting determines the sharpness of the object and the number of possible
shades of gray or color. Scan settings also affect the speed of the scan and the file
size.
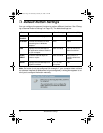
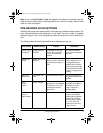
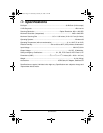
The following table shows the pre-defined scan settings you can use.
Scan Setting Default Setting To Scan Description
Faxing, Filing,
or Copying
Black and white,
200 DPI
Newspaper and maga-
zine articles, receipts,
forms, and other text
objects
Provides the fastest
scan time and smallest
file size.
Editing Text
(OCR)
Black and white,
300 DPI
Business letters, con-
tracts, memos, and other
documents you want to
edit
Enhances the use of
OCR software for con-
verting object text to
editable text. Provides
higher quality and larger
file size than the
Faxing,
Filing, or Copying
scan
setting.
Black-and-
White Photo
Grayscale, 100
DPI
Black-and-white photos Provides the best set-
ting for black-and-white
photos
Color
Photo
—
Faster
Color, 100 DPI
Color pages with many
graphics, or mixed graph-
ics and text, line art, or
photos that require a
quick scan
Creates a quality
scanned color object in
a file that is not too
large. PaperPort’s
default setting.
Color
Photo
—
Better Quality
Color, 200 DPI Photos and color objects
Provides the ideal set-
ting for color objects,
object editing, desktop
publishing, and high-
quality output. Results
in a color scan with
slower scan time and
larger file size.
25-3050.fm Page 17 Wednesday, February 16, 2000 9:42 AM