


ENGLISH
8787
PPhhoottoo
DDPPOOFF
DPOF 0
SD DPOF0
11..
PPhhoottoo
00
22.. [[PPOOWWEERR]] MMiinniikkeett PPhhoottoo00
33.. [[SShhoorrttccuutt 11]] PPhhoottoo VViieeww 00
44.. [[MMEENNUU]] 00
◆ 0
55.. <<DDPPOOFF>>00
66.. ((OOKK))
00
◆
<<SSeelleecctt>>
DPOF 0
◆
<<AAllll>>
DPOF 0
<All>DPOF All?0
(OK) 0
77.. <<SSeelleecctt>>00
//////00
88.. [[SShhoorrttccuutt 33]] [[SShhoorrttccuutt 44]]
00
◆
DPOF0
99..
CCoonnffiirrmm?? ((OOKK)) 00
◆ <Yes>
<No> (OK) 0
1100.. [[MMEENNUU]] 00
◆ <> DPOF
0
[
]
✤ DPOF
0
✤
DPOF
SD 0
✤ [Record/Stop]
0
Photo Mode :
Setting the Viewing Options
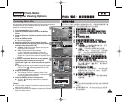
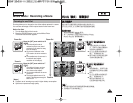
Setting the DPOF (Digital Print Order Format) Function
You can automatically print a photo file recorded with a printer that supports
DPOF. Setting the DPOF is only available mini SD card.
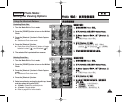
1. Turn the Mode Dial to Photo mode.
2. Press the [POWER] button to turn on the Miniket
Photo.
3. Press the [Shortcut 1] button to switch to Photo View
mode.
4. Press the [MENU] button.
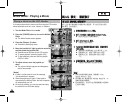
◆ Menu screen appears.
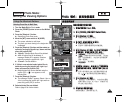
5. Move the joystick left / right to select <DPOF>.
6. Select an option by moving the joystick up / down
and then press the joystick (OK).
◆ <Select>: Multi-view screen appears and you can
select photo files to set DPOF printing.
◆ <All>: All photo files will be marked with DPOF printing.
If <All> is selected, the message “DPOF All?” appears.
Select the desired option by moving the joystick left / right
and then press the joystick (OK) to confirm.
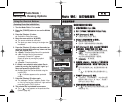
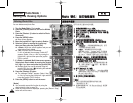
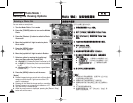
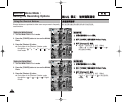
7. If <Select> is selected, Multi-view screen appears.
Select the photo files to set by moving the joystick
left / right / up / down.
8. Set the number of prints by using the [Shortcut 3]
and [Shortcut 4] buttons.
◆ Move to another photo by moving the joystick left / right
and repeat the steps to set DPOF.
9. The message “Confirm?” appears when you press the
joystick (OK).
◆ Select <Yes> or <No> by moving the joystick left / right
and then press the joystick (OK) to confirm.
10. Press the [MENU] button to exit the menu.
◆ < > icon is displayed on the photos with DPOF
setup.
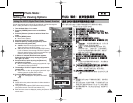
[ Notes ]
✤ Please refer to the product instructions for further details on
DPOF printer use.
✤ Using a printer that supports DPOF allows users to directly
print photos stored in a mini SD card without a PC.
✤ While the menu screen is displayed, pressing the [Record / Stop] button will
exit the menu.
5
MENU
TYPE
PhotoPhoto
Select
All
MoveMove SelectSelect ExitExit
OK
Move Confirm Exit
Move Select
1/6
100-0006
6/6
3
Photo
Move Select Exit
Move Confirm Exit
Move Select
1/6
100-0006
6/66/6
100-0006
2592
8
9
Photo
Move Select Exit
MENU
MoveMove ConfirmConfirm ExitExit
OK
Move Select
1/61/6
100-0006
6/6
Photo
Move Select Exit
Move Confirm Exit
Confirm?
Yes No
MoveMove SelectSelect
OK
1/6
100-0006
6/6