4
Select the image that you want to save.
1
Press the arrow button to move the orange frame to the
image you want to save.
2
Press the SET button.
œ
The Best Shot Confirmation Screen appears with the
selected image displayed full screen. You can press
[d] or [c] to select a different image.
œ
To return to the 4-image display, select “EXIT” and
press the SET button.
To save all four images
œ At the 4-image display, press the MODE button. All four
images are saved as a sequential shot in the
sequential shot folder.
5
Save the selected image and erase the others.
1
Make your final check of the image and select “SAVE
IMAGE ERASE OTHERS”.
2
Press the SET button.
œ
A screen confirming whether or not you want to save
the selected image and erase the others appears.
œ
To return to the Best Shot Confirmation Screen, select
“NO” and press the SET button.
3 Select “YES” and press the SET button.
œ
“PROCESSING” appears for a few moments and then
you return to the sequential shot shooting mode.
œ
The selected image is saved in the still image folder
and the other three images are deleted (nothing is
saved in the sequential shot folder).
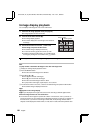
4-image display
Best Shot Confirmation
Screen
Confirmation Screen for
erasing the other images
When you have finished capturing images, turn off the digital camera.
HELP
If power is cut off during the sequential shot
œ If the digital camera is left alone for approximately one minute at step 4 (when using batteries),
the power save function activates (see page 30), the power is turned off, and all four images
are saved as a sequential shot in the sequential shot folder. If this occurs, copy the desired
image from the sequential shot folder (see page 118) and then erase the sequential shot.
Orange frame
100-0101
SAVE IMAGE
ERASE OTHERS
EXIT
Folder number and name
100-0101
SAVE IMAGE
ERASE OTHERS
YES
NO
SX511/EX, /E, /U (VPC-AZ1EX, VPC-AZ1E, VPC-AZ1 GB) Thu. Nov., 29/2001
English
68