


Chapter 1 Overview
Chapter 1 Overview 13
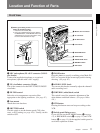
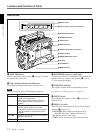
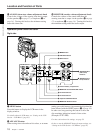
0 POWER switch
Powers the camcorder on or off.
!¡ OUTPUT/DL/DCC+ (DynaLatitude/dynamic
contrast control plus) switch
Use this switch to select the DCC+ function, the
DynaLatitude function, or color bar output.
Select the CAM/DCC+ position in most cases.
CAM/DCC+: This activates the DCC+ function.
This prevents color faults when shooting high-
intensity subjects.
CAM/DL: This setting uses the DynaLatitude
function, which finely adjusts the contrast of each
pixel according to a histogram of luminance signal
levels. Access advanced menu page 2 to set the
DynaLatitude function ON or OFF. The
DynaLatitude effect can be set to any of three
levels, Low, STD (standard), and High with basic
menu page 2.
BARS: This setting displays color bars.
For details of menu operation, see Chapter 4 “Viewfinder
Screen Displays and Menus”.
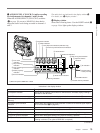
!™ NG button
When using the ClipLink function during shooting,
you can designate a particular scene as “NG” (No
Good) by pressing this button before shooting the next
scene. Press the button again to cancel the NG setting.
!£ GAIN switch
This selects one of the three gain settings, high,
medium or low. You can choose the gain values
assigned to the H, M and L settings from values from
–3 dB to 24 dB + DPR and hyper gain. (See page 85.)
The factory default selections are 18 dB (H), 9 dB (M)
and 0 dB (L).
Note
When the HYPER GAIN switch (7 on page 21) is in
the ON position, the GAIN switch has no effect.
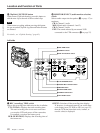
!¢ ATW (auto tracing white balance) button and
indicator
Press this button, turning the indicator on, when you
want the white balance to be adjusted automatically to
follow changes in lighting conditions. (See page 102.)
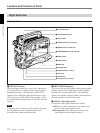
4 EZ (“easy”) MODE button and indicator
Press this button (EZ mode on) when you want to be
able to shoot immediately, with automatic adjustment
of the camcorder settings to standard values. (See page
88 for EZ mode setting.) When this function is used,
the iris and the white balance are adjusted
automatically. (The total level control system
functions.) Press this button again to return the
camcorder to the previous settings (EZ mode off).
Note
When the RM-M7G Remote Control Unit is
connected, the “easy mode” function is disabled.
5 ZEBRA button and indicator
Depress this button to display a zebra pattern (diagonal
stripes) in the viewfinder.
Depending on the zebra setting in advanced menu page
4 (see page 86), the zebra 1 for video levels between
70 to 90 IRE (or 70 to 90%) and the zebra 2 for video
levels 100 IRE or more (or 100% or more) can be
displayed independently or simultaneously.
6 A.IRIS (auto iris) MODE switch and indicator
When you use the auto iris function (by setting the iris
selector on the lens to A), set this switch to suit the
shooting conditions. Selecting BACK L gives more
light to back-lit subjects, and selecting SPOT L adjusts
for high contrast in spot-lit subjects. For normal
shooting, set this switch to STD.
7 MENU switch
When you press this switch to the ON position, the
basic menu is displayed. Keep pressing it to the ON
position to cycle through the various menu displays.
When you press the switch to the STATUS position,
the camcorder’s status (of current settings) is
displayed.
8 W. BAL (white balance) switch
This selects the white balance setting from the preset
value, the value in memory A or the value in memory
B. (See page 100.) You can select the preset white
balance at 3200 K or 5600 K using the FILTER
control (3 on page 11). If you select the 3200 K
preset, it can be switched to the 3000 K preset in
advanced menu page 3 (see page 85).
9 MENU dial
Use this dial to change menu pages or settings.