


70 Chapter 3 Shooting
Chapter 3 Shooting
4 Press the ClipLink CONTINUE button.
The tape remaining indication in the display
window flashes as the camcorder automatically
searches the recording stop point. When it finds the
recording stop point, it stops and enters recording
pause mode.
Once it has stopped, check that the
CONT indication
appears in the display window.
To find the recording stop point efficiently
If you press the ClipLink CONTINUE button after
rewinding or fast forwarding the tape to the
position between the previous recording’s start
point and stop points, the recording stop point can
more efficiently be found via an automatic search
function.
If the recording stop point cannot be found, the
CONT indication flashes in the display window.
5 Press the VTR button on the camcorder or the lens.
This starts the recording function.
6 When the recording is finished, set recording pause
mode (or specify a Mark OUT point).
The time code (HH:MM:SS), scene number (serial
number of scene during which recording was
stopped) and other data for the current clip
(contents between the Rec IN and Rec OUT points
or between Mark IN and Mark OUT points) are
recorded into cassette memory. The Index Pictures
for the recorded scene are recorded after the
recorded scene when the DSBK-301 is fitted.
Repeat steps 5 and 6 to start recording the next
scene.
The Index Pictures are recorded onto the tape as
described below when the DSBK-301 is fitted.
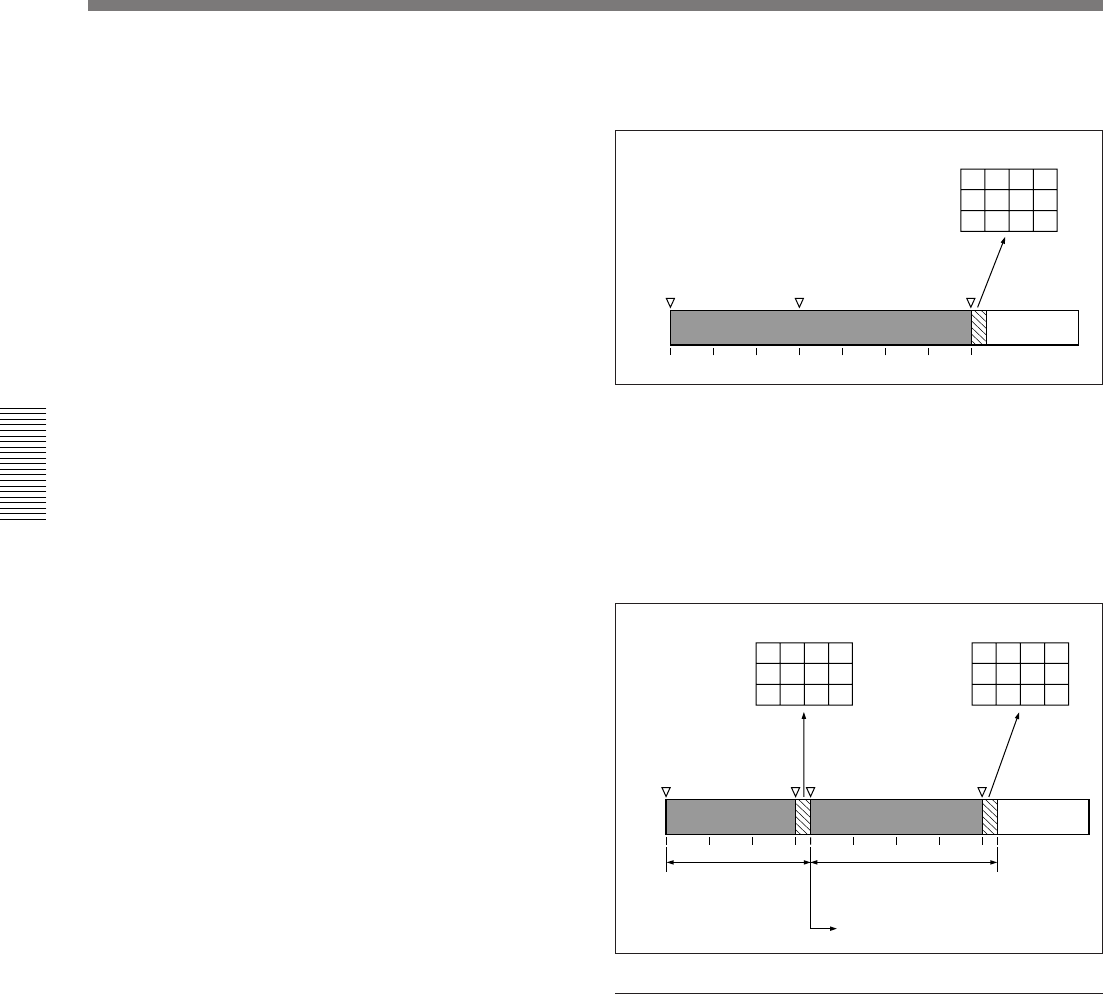
When all Index Pictures are recorded at the end
of the recordings
When two or more series of Index Pictures are
separately recorded
Two or more series of Index Pictures may be
recorded if ClipLink shooting is once interrupted
due to ejecting the cassette and resumed (in case of
changing the camcorder on resuming, for
example).
If there is no need for ClipLink continue
It is not necessary to press the ClipLink CONTINUE
button when restarting recording.
See step 4 in the previous section “Resuming
Recording in ClipLink Mode”.
The contents recorded on the cassette may differ in this
case depending on the settings when the recording is
restarted.
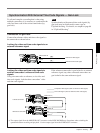
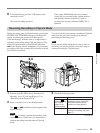
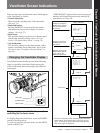
ClipLink Shooting
ABC DEFG
DEF GABC
Insert cassette in camcorder B.
Clip
Recording
start
Recording
stop
Remove
cassette.
Index Pictures A
Camcorder A Camcorder B
Recording
restart
(ClipLink
continue)
Index Pictures B
Recording
stop
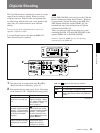
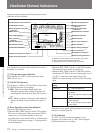
ABCD
EFG
ABCDEFG
Clip
Recording stop
Recording restart
(ClipLink continue)
Index Pictures
Recording
start
Recording
stop