


Table of
contents
Operation
Search
HOME/MENU
Search
Index
134
GB
Enjoying images on your
computer
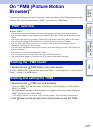
For details on the “PMB” functions, see the “PMB Guide”.
When importing images in the internal memory, step 1 is unnecessary.
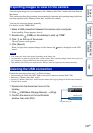
1 Insert a “Memory Stick Duo” media with recorded images into the camera.
2 DSC-T900:
Insert the sufficiently charged battery pack into the camera, or connect the
multi-output stand to a wall outlet (wall socket) with the AC Adaptor (sold
separately) and attach the camera to the multi-output stand.
DSC-T90:
Insert the sufficiently charged battery pack into the camera, or connect the
camera to a wall outlet (wall socket) with the AC Adaptor (sold separately)
and the USB/AV/DC IN Cable for multi-use terminal (sold separately).
• Use a Type1a-compliant USB/AV/DC IN Cable.
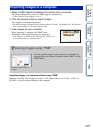
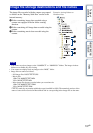
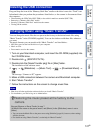
3 Turn on the computer, then press (Playback) button.
4 Connect the camera to your computer.
“Connecting…” appears on the screen of the camera.
• When a USB connection is established for the first time, your computer automatically runs a program
to recognize the camera. Wait for a while.
• When you import/export images to your computer using a battery pack with little remaining charge,
transferring may fail or image data may become corrupted if the battery pack shuts down too soon.
• is displayed on the screen during the communication session. Do not operate the computer while the
indicator is displayed. When the indicator changes to , you can start using the computer again.
• If “Mass Storage” does not appear, set [USB Connect] to [Mass Storage] (page 70).
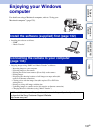
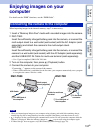
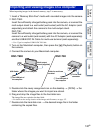
Connecting the camera to the computer
Notes
USB Cable
1To a USB jack of
the computer
2To a USB jack
Multi-output
stand (supplied)
2To the multi
connector
1To a USB jack of
the computer
Cable for multi-use
terminal
DSC-T900 DSC-T90