


67
Dubbing/Editing
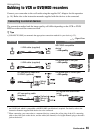
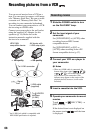
3 Connect your recording device
(VCR or DVD/HDD recorder) to
your camcorder.
See page 65 for connection details.
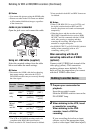
4 Start playback on your
camcorder, and recording on the
recording device.
Refer to the operating instructions
supplied with your recording device for
details.
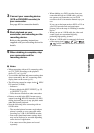
5 When dubbing is complete, stop
your camcorder and the
recording device.
b Notes
• When connecting with an A/V connecting cable,
set [TV TYPE] according to the playback
device (TV, etc.) (p. 60).
• To record the date/time and camera settings data
when connected by the A/V connecting cable,
display them on the screen (p. 61).
• The following cannot be output via the HDV/
DV interface (i.LINK):
– Indicators
– Pictures edited with [PICT.EFFECT] (p. 55)
or [D.EFFECT] (p. 54)
– Titles that are recorded on other camcorders
• Pictures recorded in the HDV format are not
output from the HDV/DV Interface (i.LINK)
during playback pause or in any playback mode
other than normal playback.
• Note the following when connecting with an
i.LINK cable:
– The recorded picture becomes rough when a
picture is paused on your camcorder while
recording to a VCR or DVD/HDD recorder.
– Data codes (date/time/camera settings data)
may not be displayed or recorded depending
on the device or application.
– You cannot record the picture and sound
separately.
• When dubbing to a DVD recorder from your
camcorder through an i.LINK cable, you may
not operate your camcorder on your DVD
recorder even if its instruction manual says you
can.
If you can set the input mode to HDV or DV on
your DVD recorder and can input/output
pictures, follow the steps in “Dubbing to another
device.”
• When you use an i.LINK cable, the video and
sound signals are transmitted digitally,
producing high quality pictures.
• When an i.LINK cable is connected, the format
of the output signal ( or
) will be indicated on the LCD screen of
your camcorder.