


69
E:\SONY\2659814111\01GB05BAS_E.fm
DCR-HC36E/HC44E/HC46E/HC94E/HC96E
2-659-814-11(1)
Dubbing/Editing
1 Prepare your camcorder for
playback.
Insert the recorded cassette.
For DCR-HC44E/HC46E/HC94E/
HC96E:
Set [TV TYPE] according to the
playback device (TV, etc.) (p. 39).
2 Prepare your VCR/DVD device for
recording.
When dubbing to the VCR, insert a
cassette for recording.
When dubbing to the DVD recorder,
insert a DVD for recording.
If your recording device has an input
selector, set it to the appropriate input
(such as video input1, video input2).
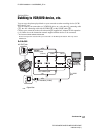
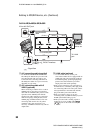
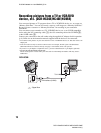
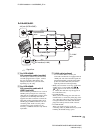
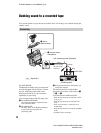
3 Connect your VCR/DVD device to
your camcorder as a recording
device.
Connect your camcorder to the input
jacks of a VCR or a DVD device.
4 Start playback on the camcorder,
and recording on the VCR/DVD
device.
Refer to the operating instructions
supplied with your recording device for
details.
5 When dubbing is complete, stop
your camcorder and the VCR/DVD
device.
• To record the date/time and camera settings data
when connected by the A/V connecting cable,
display them on the screen (p. 63, 64).
• The following cannot be output via the DV
Interface (i.LINK):
– Indicators
– Pictures edited using [PICT. EFFECT]
(p. 58), [D. EFFECT] (p. 56) or PB zoom
(p. 30).
• When connected using an i.LINK cable, the
recorded picture becomes rough when a picture
is paused on your camcorder while recording to
a VCR.
• When connected using an i.LINK cable, data
code (date/time/camera settings data) may not
be displayed or recorded depending on the
device or application.