


Chapter 10
Setup Menus
10-18
Chapter 10
Setup Menus
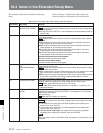
10-4 Items in the Extended Setup Menu
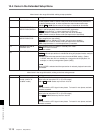
Menu items in the range 500 to 599, relating to tape protection
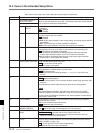
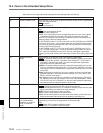
Menu items in the range 600 to 650, relating to the time code generator
Item number
Item name Settings
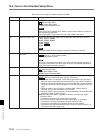
501
STILL TIMER
Select the time delay from the tape transport stopping (either the “stop mode” or
the still playback mode in search mode) until the unit automatically switches to
the tape protection mode, in order to protect the video heads and the tape.
0.5S to 8M to 30M: Set the value in the range 0.5 seconds to 30 minutes.
502 TAPE PROTECTION
MODE FROM SEARCH
Select the operation of the protection mode to protect the video heads and tape
when in the still playback mode in search mode (jog/shuttle).
STEP : Step forward at
1
/30 normal speed every 2 seconds.
STDBY: Switch to “Standby OFF mode” (the unit not on standby).
T.REL: Switch to tension release mode (the tape tension slackened).
503 TAPE PROTECTION
MODE FROM STOP
Select the operation of the protection mode to protect the video heads and tape
when stopped (the “stop mode”).
STDBY : Switch to “Standby OFF mode” (the unit not on standby).
T.REL: Switch to tension release mode (the tape tension slackened).
STEP: Step forward at
1
/30 normal speed every 2 seconds.
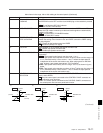
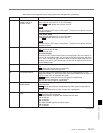
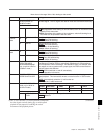
504 DRUM ROTATION IN
STANDBY OFF
Select whether the drum rotates in “Standby OFF mode”.
OFF : Drum does not rotate.
ON: Drum rotates.
505
STILL TENSION Select the tape tension state in the still playback mode.
NORML : Normal tape tension is maintained during still playback mode, ready for
playback.
LOOSE: Reduce the tape tension further from the NORML setting. (Select
“LOOSE” when the unit is on standby for a long period of still playback, for
example, in a library management system (LMS).)
Note
When LOOSE is selected and the tape tension is reduced, playback cannot be
guaranteed.
Item number
Item name
Settings
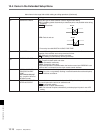
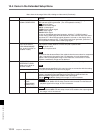
601 VITC POSITION SEL-1
(Invalid in 24PsF or
23.98PsF mode)
In 59.94i, 29.97PsF mode
Select a line to insert the VITC in. (For SD output)
12H to 16H to 20H: Select any line from 12 to 20.
Note
You can insert the VITC signal in two places. To insert it in two places, set both
items 601 and 602.
In 50i, 25PsF mode
Select a line to insert the VITC in. (For SD output)
9H to 19H to 22H: Select any line from 9 to 22.
Note
You can insert the VITC signal in two places. To insert it in two places, set both
items 601 and 602.
(Continued)