


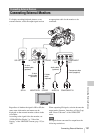
External Synchronization
138
Connecting External Devices
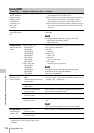
About data transfer speed of i.LINK
i.LINK defines a maximum data transfer speed of
approximately 100, 200 and 400 Mbps
1)
that are
described as S100, S200 and S400 respectively.
For i.LINK devices, a maximum data transfer
speed that the device supports is identified on
“Specifications” page of the operating
instructions supplied with the device or near its
i.LINK connector.
1)
When connecting with the device that support
different data transfer speed, the actual data transfer
speed may be different from those described on the
i.LINK connectors.
What is Mbps?
Mega bits per second. A measure of the rate at
which data is transmitted per second. In case of
100 Mbps, 100 Mega bits of data can be
transmitted per second.
i.LINK operation with your camcorder
For details on operation when other equipment
with i.LINK (HDV) connector is connected, see
page 135.
For details on connection with i.LINK cable and
necessary software, refer to the operating
instructions supplied with the connected device.
About the required i.LINK cable
Use the Sony 6-pin-to-4-pin or 4-pin-to-4-pin
i.LINK cable (for HDV dubbing) to connect the
i.LINK devices.
i.LINK and are trademarks.
When multiple units of the PMW-EX3 are used in
the same shooting location, recording can be
made in synchronization with a specific reference
signal, and the timecode can be matched among
all the units.
Aligning the phase of the video signal
(Genlock)
Genlock operation is enabled by supplying an SD
or HD reference signal to the GENLOCK IN
connector of the camcorder.
If the video format is set to HQ 1080/24P, select
the sync mode (60i or 24PsF) with “Genlock”
(page 129) of the OTHERS menu.
The phase adjustment for the reference signal can
also be made with “Genlock” of the OTHERS
menu.
Notes
• If the reference signal is unstable, genlock is not
possible.
• The subcarrier is not synchronized.
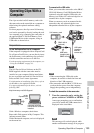
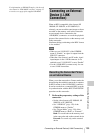
Synchronizing the timecode of your
camcorder with that of another unit
The timecode of your camcorder can be locked to
that of another unit.
Set the unit that supplies the timecode to a mode
in which the timecode output keeps advancing
(Free Run or Clock mode).
1 Set “Timecode” of the TC/UB SET
menu as follows:
Mode: Preset
Run: Free Run
2 Press the TC/U-BIT/DURATION
button so that the timecode is displayed
on the screen.
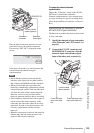
3 Supply an HD or SD reference video
signal to the GENLOCK IN connector
and the reference timecode to the TC IN
connector.
External Synchronization